SMS for Microsoft Azure Communication Services - Messaging Connect
 SMS
SMS
Microsoft Azure Communication Services (ACS) is a fully managed cloud platform that enables developers to embed real-time communication—SMS, email, voice, video, and chat—directly into their applications, using the same infrastructure that powers Microsoft Teams.
To extend SMS capabilities globally, Messaging Connect allows you to integrate Infobip, as an external provider, enabling SMS delivery in regions where ACS currently does not support local numbers or coverage.
The SMS for Microsoft Azure Communication Services – Messaging Connect app connects your Infobip numbers to Azure Communication Services, giving you the ability to send and receive SMS messages through Infobip's global network, directly from your Azure-based applications. This integration makes Infobip your SMS delivery provider, while ACS handles communication orchestration and application integration.
The benefit of this integration is that you obtain numbers directly from Infobip and use them as if they were native ACS numbers, whilst leveraging the management capabilities of country-specific regulations and onboarding flows.
Features
Send SMS
Send SMS over Microsoft Azure Communication Services
Inbound SMS
Receive inbound SMS to Microsoft Azure Communication Service
Purchase Infobip numbers
Purchase numbers and connect them to Microsoft ACS
Messages flow in Azure
This integration gives you the flexibility to scale SMS globally without changing your existing Azure-based communication workflows.
In the Azure portal, when searching for SMS numbers by type and country, if ACS does not support that region directly, you are prompted to connect with Infobip. You can then purchase numbers for use in your ACS applications through the Infobip integration.
Depending on the destination country and sender type, you may need to:
- Complete a registration process and submit documentation
- Wait for approval based on local regulations
When the Infobip numbers are approved, they appear in your Azure portal, ready to use with Messaging Connect.
Prerequisites
- An Infobip account or create a new Infobip account
- Infobip API key
- Microsoft Azure Cloud account (access to Azure Communication Services)
- Immutable resource ID for the Azure Communication Services resource you want to use
See the Create an account steps for more information.
Create an Infobip API key
You need to create an API key for your Infobip account. You use this API key in your Azure API call.
-
Log in to Infobip and go to Developer tools > API keys.
-
Click Create API key.
-
In the API Scopes section, select the scope that gives permission to use send SMS messages:
sms:message:send -
Save the API key in a secure place. You will use this API key in your Azure API call.
For more information about API keys, see API authentication.
Find the Immutable resource ID from Azure
An Immutable resource ID is the permanent, unchanging identifier assigned to a specific Azure resource. This ID remains the same for the lifetime of the resource and is used internally and externally to uniquely identify that resource within Azure. To obtain the Immutable resource ID and add it to the integration:
- Go to Communication Services on your Azure portal.
- Select the resource that you want to connect to Infobip.
- On the left menu panel, go to Settings > Properties.
- In the list of properties, find the value of the Immutable resource ID. The ID is in the following format:
33f013f6-05bb-e68d-b8e5-3b31809327ed.
You use this ID to add to the Azure Communication Services resources when the SMS for Microsoft Azure Communication Services - Messaging Connect app in Exchange and add the ACS resource.
For more information, see Add an Azure Communication Services resource.
Install and configure the app
To install and configure the integration between Microsoft Azure Communication Services - Messaging Connect and Infobip numbers, these are the high-level steps:
- Install the app in Exchange Marketplace.
- Add an Azure Communication Services resource.
- Choose your Infobip number.
- Enable Azure Communication Services for your number.
- Select inbound configuration for your number.
- Complete the set up.
The following sections describe the high-level steps in more detail.
Install the app in Exchange Marketplace
- Log in to your Infobip account. If you do not have an account, you can sign up.
- Go to Exchange > Apps Marketplace.
- On the All Apps tab, search for Microsoft Azure Communication Services Messaging Connect.
- Click the SMS for Microsoft Azure Communication Services - Messaging Connect card. This opens the app details page showing the prerequisites and important notes.
- Click Open to start the setup process. You see the SMS for Microsoft Azure Communication Services - Messaging Connect configuration page.

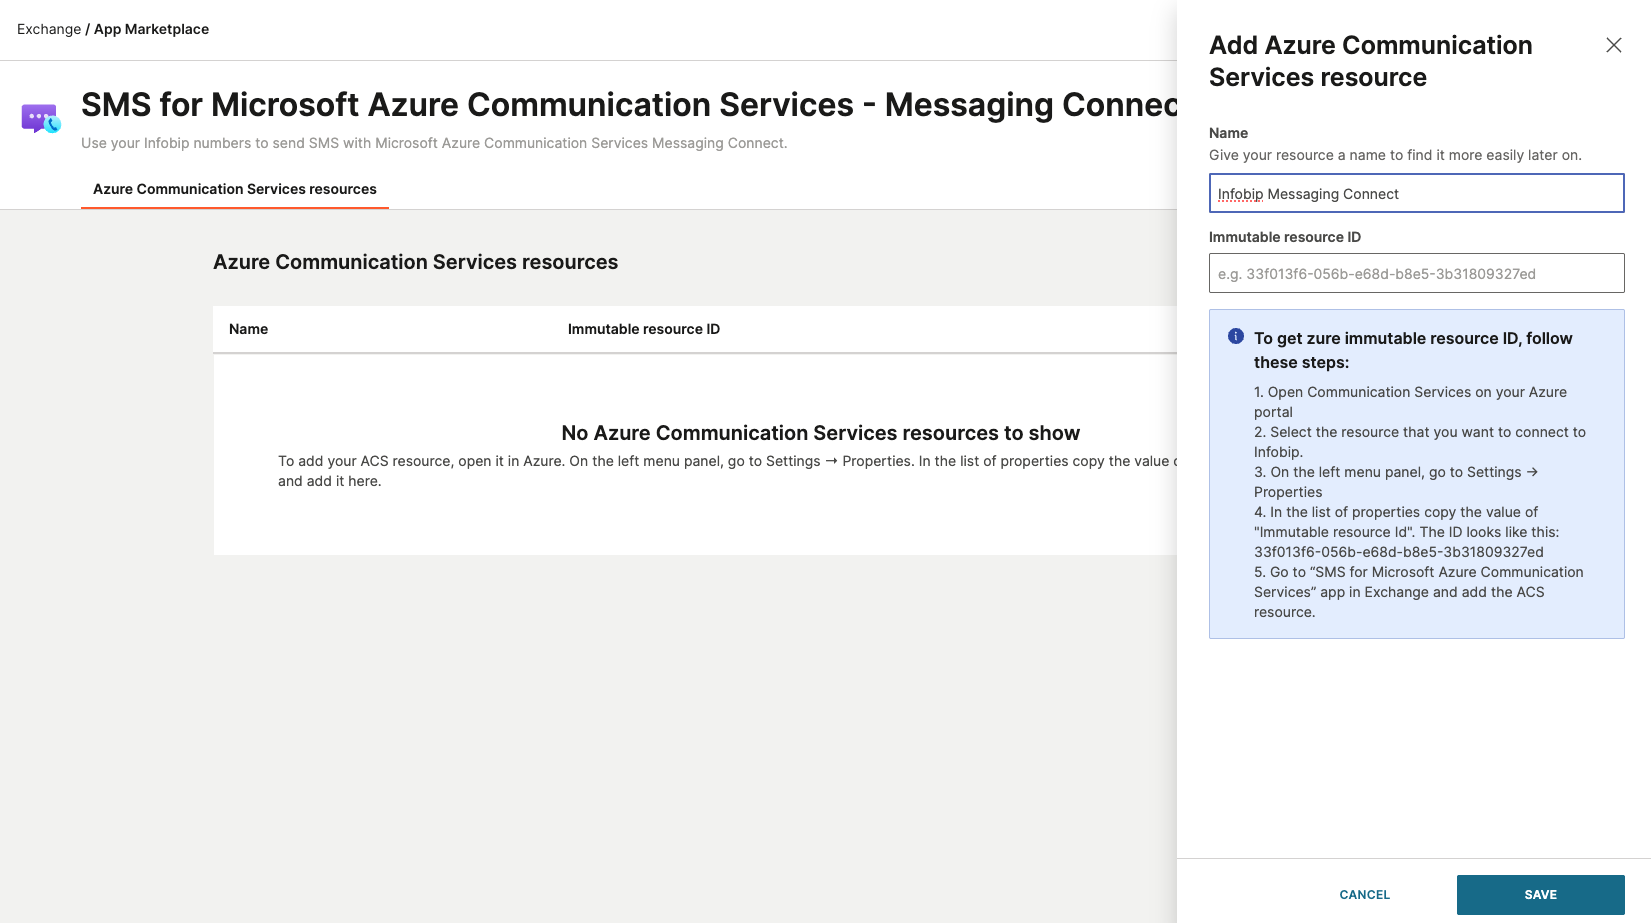
Add an Azure Communication Services resource
The SMS for Microsoft Azure Communication Services - Messaging Connect configuration page shows the available Azure Communication Services resources, including the name and associated Immutable resource ID of each resource. You can also add a new resource from this page.
-
Click Add resource to create a new resource. You see a panel on the right side of the screen. From here you add the details of the resource:
- Name: resource name
- Immutable resource ID: identifier assigned to a specific Azure resource
If you do not already have the ID, follow the on-screen instructions or see the see Find the Immutable resource ID from Azure section.
-
Click Save to save the Azure Communication Services resource.
Choose your Infobip number
You now need to select the Infobip SMS number that you want to connect to Microsoft Azure Communication Services. If you do not have an Infobip number, you may purchase a number or select from available options. To buy an Infobip SMS number:
- Go to Channels and Numbers > Numbers to buy an SMS-supported number.
- Use the default buy number flow. For more information, see the Numbers documentation.
- Ensure that you select the country where you plan to send SMS traffic.
Your number is then ready to be added to Microsoft Azure Communication Services resources. When you have bought your number or if you already have an Infobip SMS number, select it from the list. From here, you can:
- Enable Microsoft Azure Services Communication Services for your number.
- Set up the inbound configuration for your number.
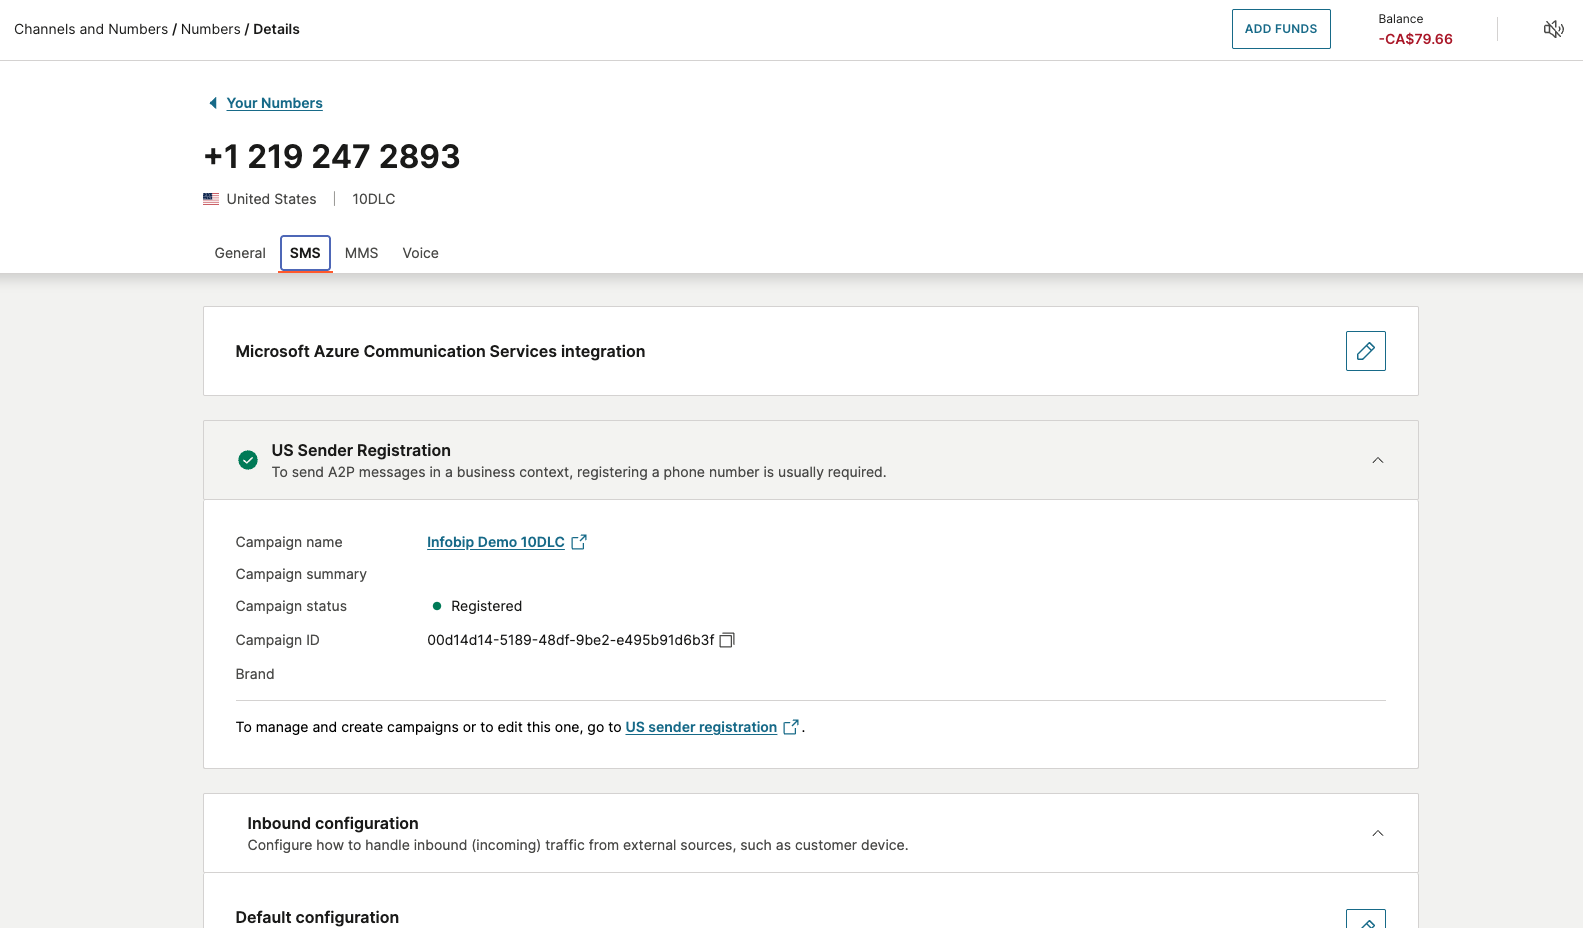
Enable Azure Communication Services for your number
These steps make sure that your number is able to use the SMS for Microsoft Azure Communication Services - Messaging Connect integration.
-
Go to Channels and Numbers > Numbers and select the number you want to connect to Azure Communication Services.
-
Select the SMS tab, and then click the edit icon for Microsoft Azure Communication Services integration.
-
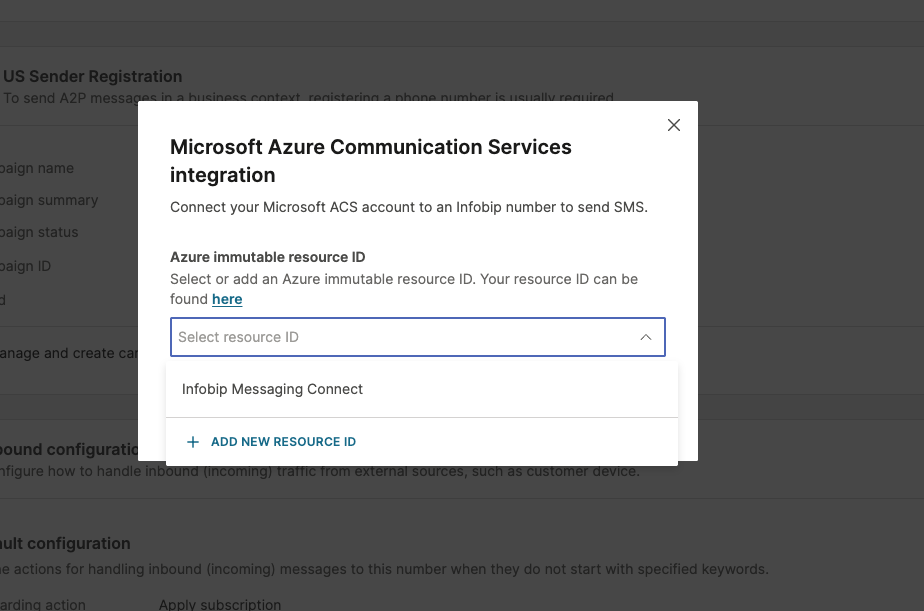
Select the Immutable resource ID to which you want your number to connect. See Find the Immutable resource ID from Azure.
-
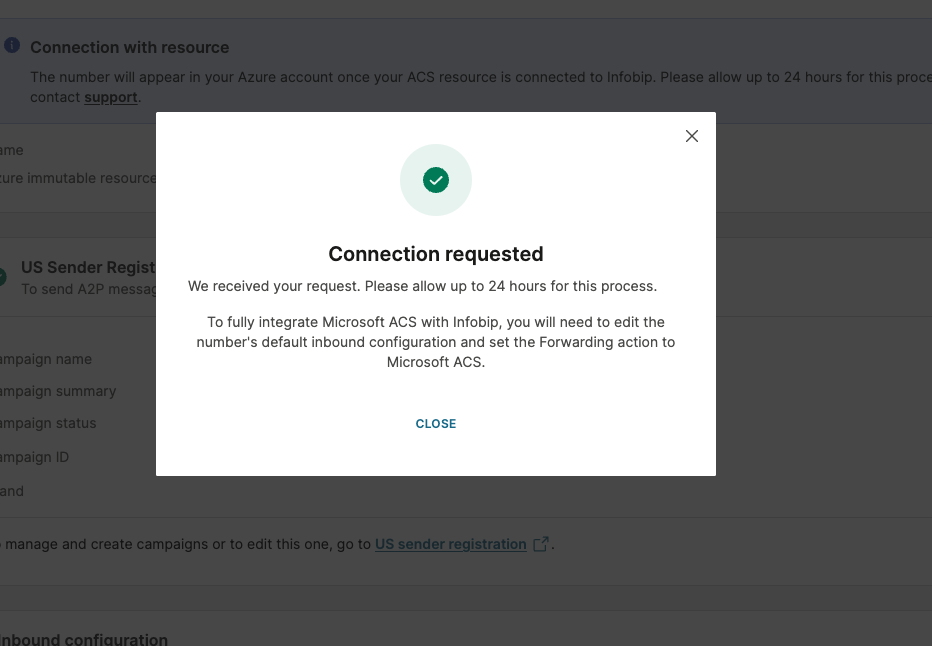
Click Connect.
The connection is requested and you see a message to indicate that Infobip has received your request and it may take up 24 hours to process.
-
Click Close.
Select inbound configuration for your number
To ensure that the Microsoft Azure Communication Services integration with Infobip is fully set up, you need to edit the number's default inbound configuration and set the Forwarding action to Microsoft Azure Communication Services:
- Go to Channels and Numbers > Numbers and select the number that you wish to connected to Azure Communication Services.
- Select the SMS tab, and then click Inbound configuration.
- In Forwarding action, select the Forward to external platform integration option.
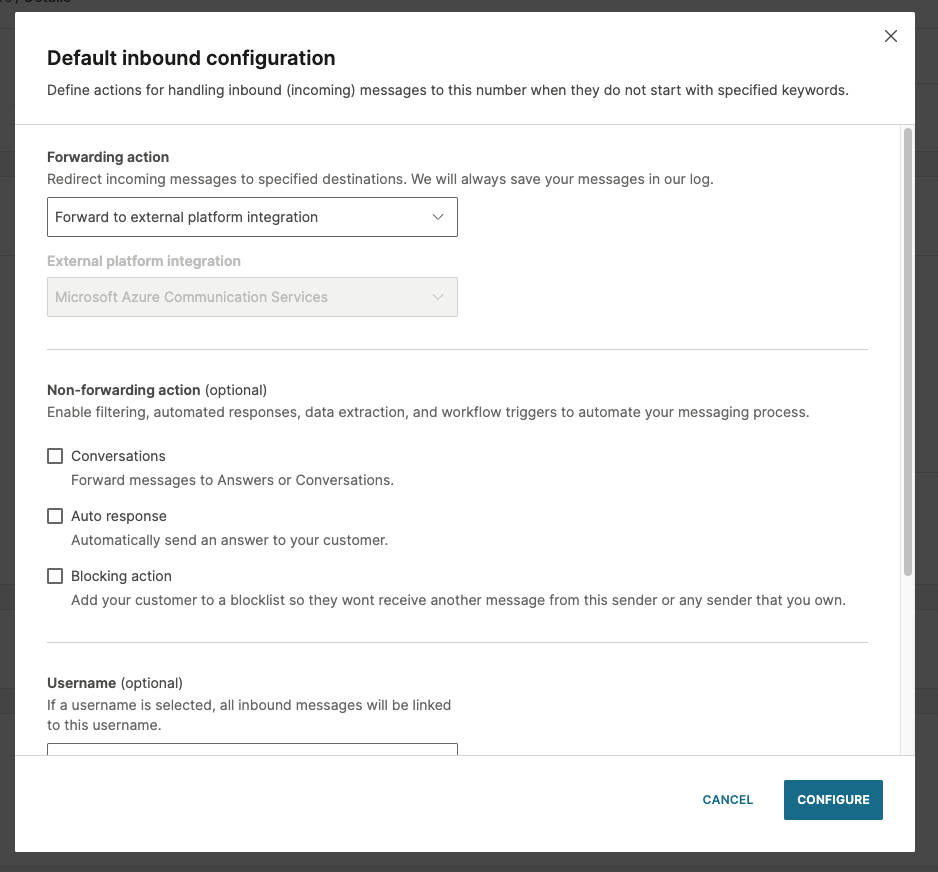
- Ensure that Microsoft Azure Communication Services is displayed as the external platform.
- Select Configure.
Complete the setup
- Review your configuration settings to ensure accuracy.
- Click Finish or Complete Setup to complete the setup process.
After setting up the integration, it may take up to 24 hours to set it up. If there are any issues, contact Support for more information.
Verify the integration
After completing the setup steps for the SMS for Microsoft Azure Communication Services - Messaging Connect app, verify that the integration is working correctly. You can verify the success of the integration by:
- Send a test SMS message through the channel in Azure Communication Services.
- View the message logs and delivery reports
- Check the connection status.