Send your first SMS message
This guide is for self-signup accounts. If you have a managed account with Infobip, your onboarding process and trial activation are handled by your dedicated Customer Success Manager or Solutions Engineer. Contact your Infobip representative for next steps.
To use SMS on Infobip, first create an Infobip account (if you do not already have one) by completing the platform onboarding.
Sign up for a free trial [#sign-up-for-a-free-trial]
New Infobip users automatically receive a 60-day free trial.
Your free trial includes:
- Free messages and receivers
- 15 free SMS messages
- Five verified numbers to receive SMS message
- One-way and two-way communication
- For two-way SMS communication, where available, you have a shared Virtual Long Number (VLN) ↗ which can be used during the free trial. If you need a number, VLN, or shortcode for your two-way use case, you can buy a number for sending and receiving SMS messages after you upgrade your account to a paying one.
SMS coverage for self-sign-up users is available worldwide, with the following exceptions: Belarus, British Indian Ocean Territory, China, Crimea, Cuba, Iran, Myanmar, New Zealand, North Korea, Northern Cyprus, South Sudan, Syria, and Yemen.
If you are interested in one of the unsupported countries, contact Infobip Support.
When your free trial ends, a banner appears at the top of your homepage. You can add funds by selecting the Upgrade now button, enabling you to continue sending messages to your customers.
Start using SMS [#start-using-sms]
When you have registered for an Infobip account and started your free trial, you can send your first SMS message.
Open the SMS channel
From the Get started with channels page, select the SMS channel, and then select Start testing.
Choose a user type
Select Business user to test messages from a simple user interface. See Get started as a Business user.
Select Developer to send test messages using a ready-built API request. See Get started as a Developer.
Send your first message
Use the on-screen steps to send your first message.
Get started as a business user [#get-started-as-a-business-user-start-using-sms]
Take your first steps with SMS as a business user:
- Send your first message. The recipient field is prepopulated with the number you verified during sign-up. During the free trial, you can add up to five recipients with verified numbers. Make sure the prepopulated details are correct and select Send Message.
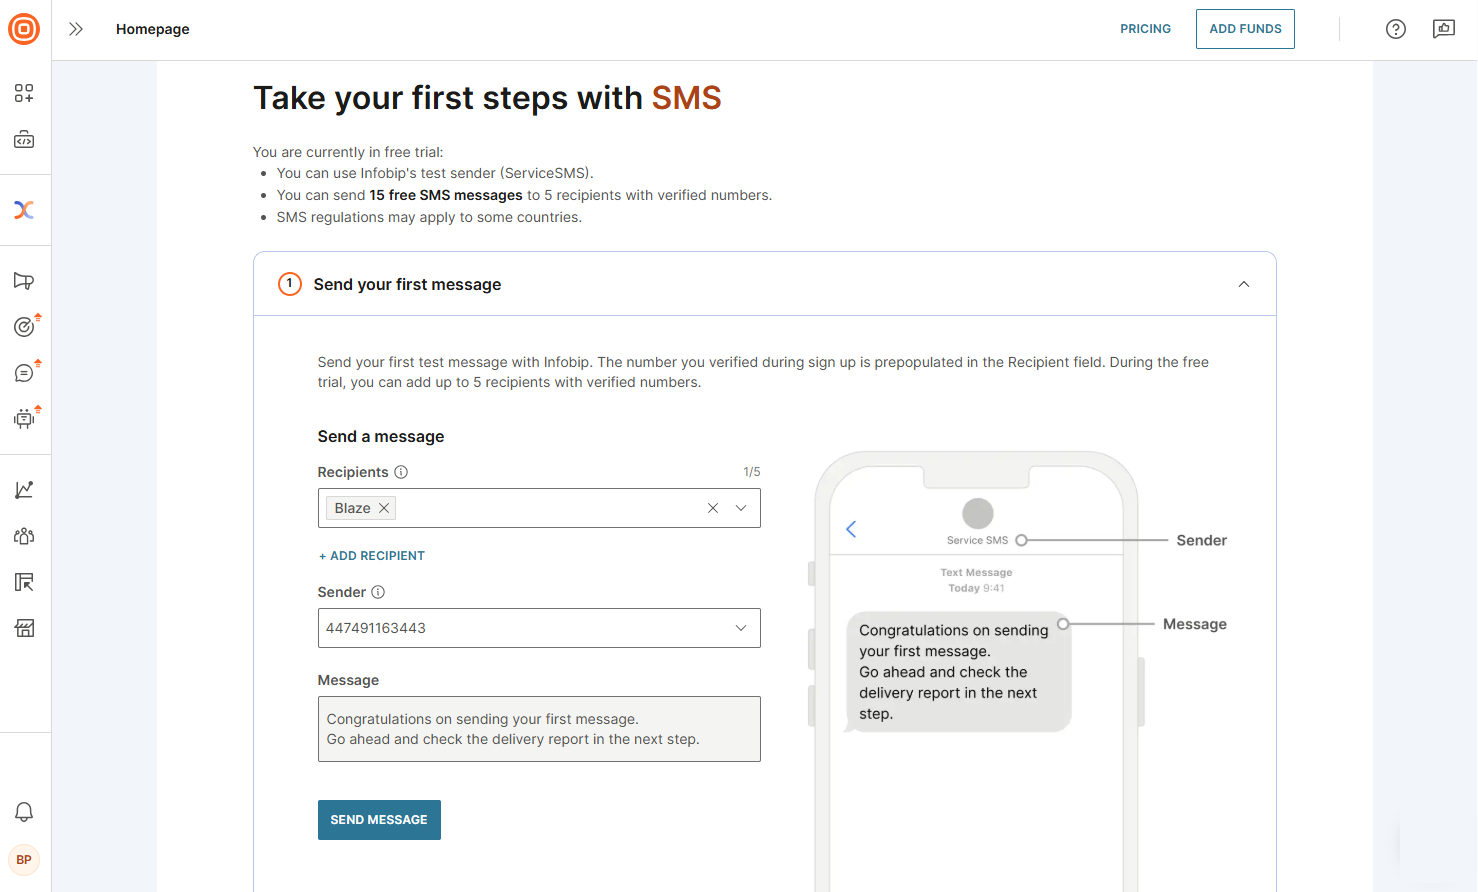
- Check message status log. When you send your first message, you can use this step to check the delivery logs to confirm successful delivery. If delivery fails, you see a delivery log and you can use the response status and error codes to review the issue.
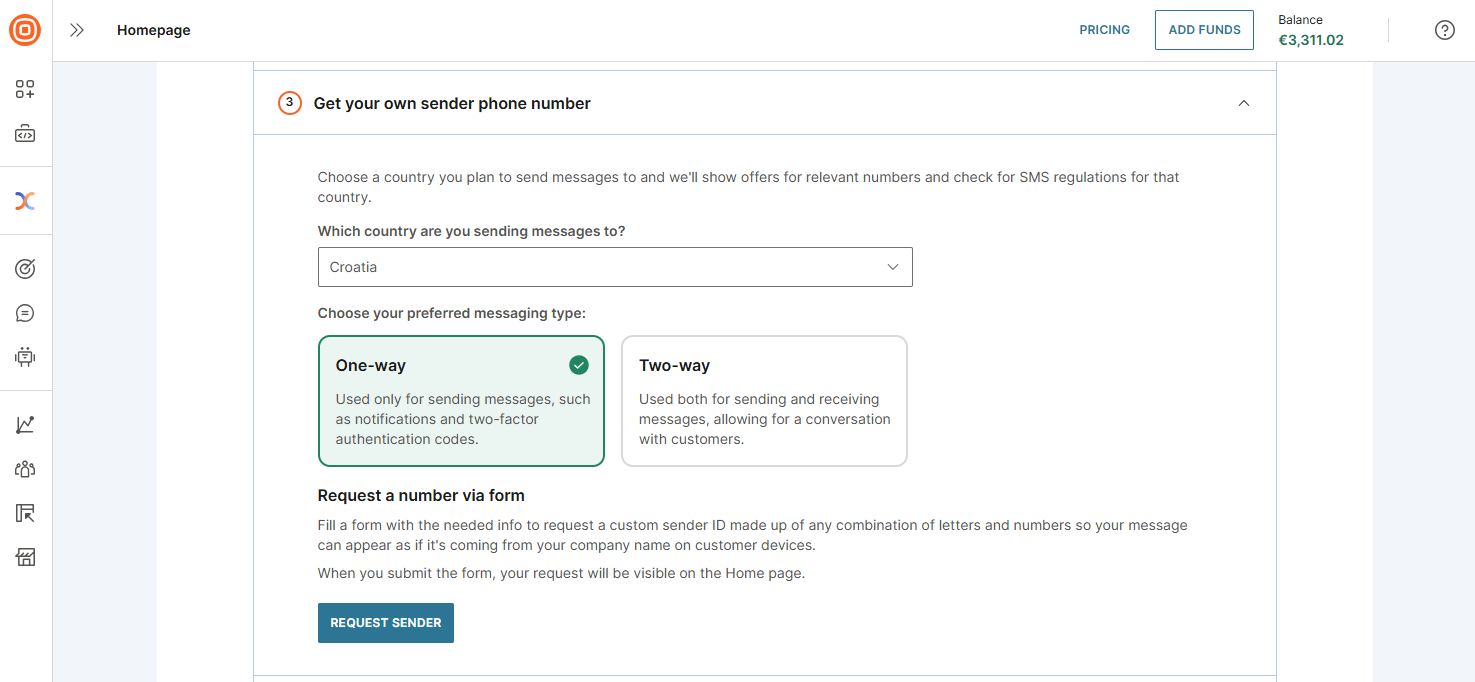
- Get your own sender phone number. To send live traffic, you need to acquire your own sender phone number:
- Choose a country where you plan to send messages. You see the available offers for relevant numbers and the SMS regulations for that country.
- Choose your preferred messaging type:
- One-way: Used only for sending messages, including as notifications and two-factor authentication codes.
- Two-way: Used for both sending and receiving messages, enabling two-way communication with customers.
- Request a number using a form: Complete the form with the required information to request a custom sender ID, which can be a combination of letters and numbers. This enables your messages to appear as if they are coming from your company name on customer devices.
- Select Request sender.
- (Optional) Upgrade your account. To upgrade your account, select Add funds and follow the steps to become a paying account.
To upgrade your account at a later time:
- If your free trial is still active, select Add funds at the top of the web interface.
- If your trial has expired, a banner appears on your homepage. Select Upgrade now to add funds.
Get started as a developer [#get-started-as-a-developer-start-using-sms]
To start sending SMS messages as a developer, choose one of the available solutions on the following tabs:
- SMS messages: Use this to try out the Infobip SMS API ↗
- 2FA with SMS: Use this solution to send and verify one-time passcodes (OTPs) ↗
SMS messages [#sms-messages-start-using-sms]
Try out the SMS API to send your first SMS message. On the SMS messages tab:
- Send your first SMS message. The recipient field is prepopulated with the number you verified during sign-up. During the free trial, you can add up to five recipients with verified numbers.
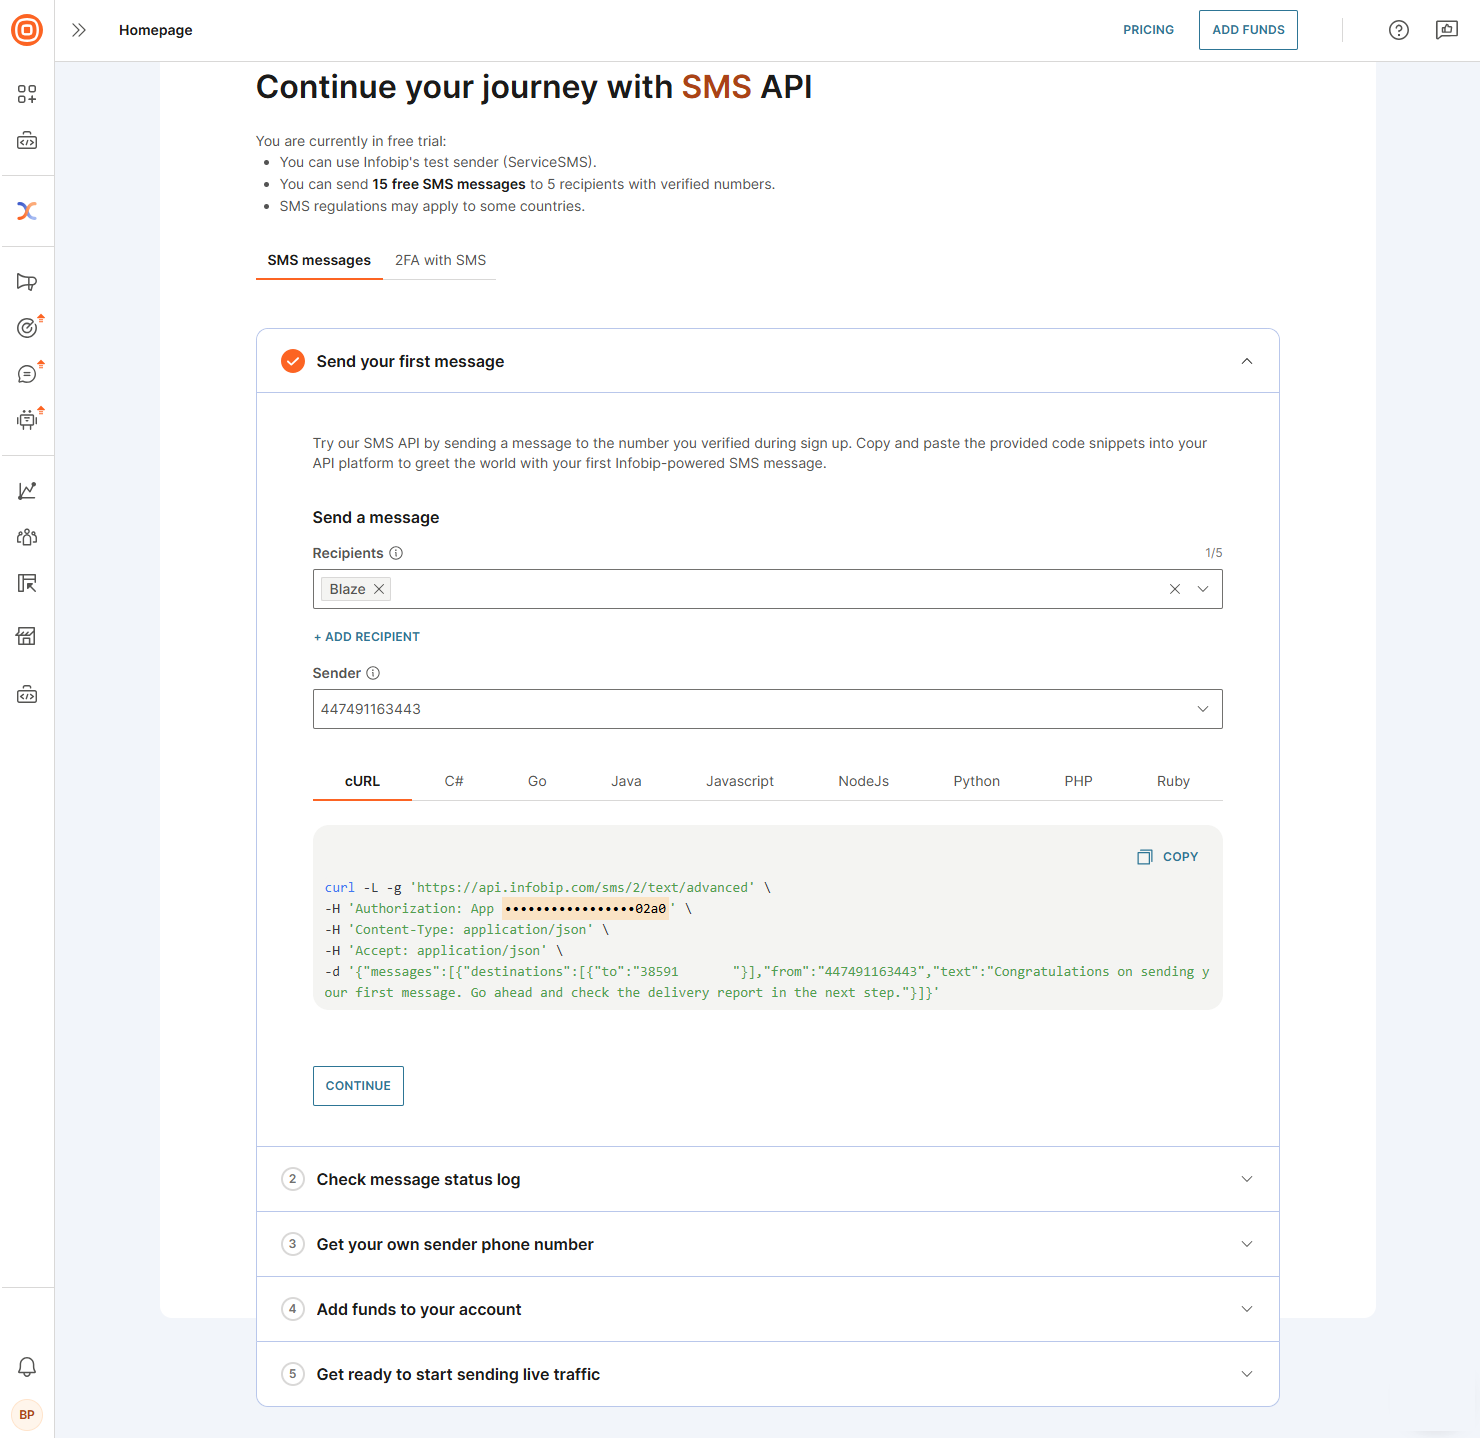
- Follow the steps on the SMS messages tab.
- When you send your first SMS message, you can:
- View the message status log
- Get your own sender phone number (mandatory step for sending live traffic)
- (Optionally) Top up your account
- Review the response status and error codes to identify any delivery failure issues
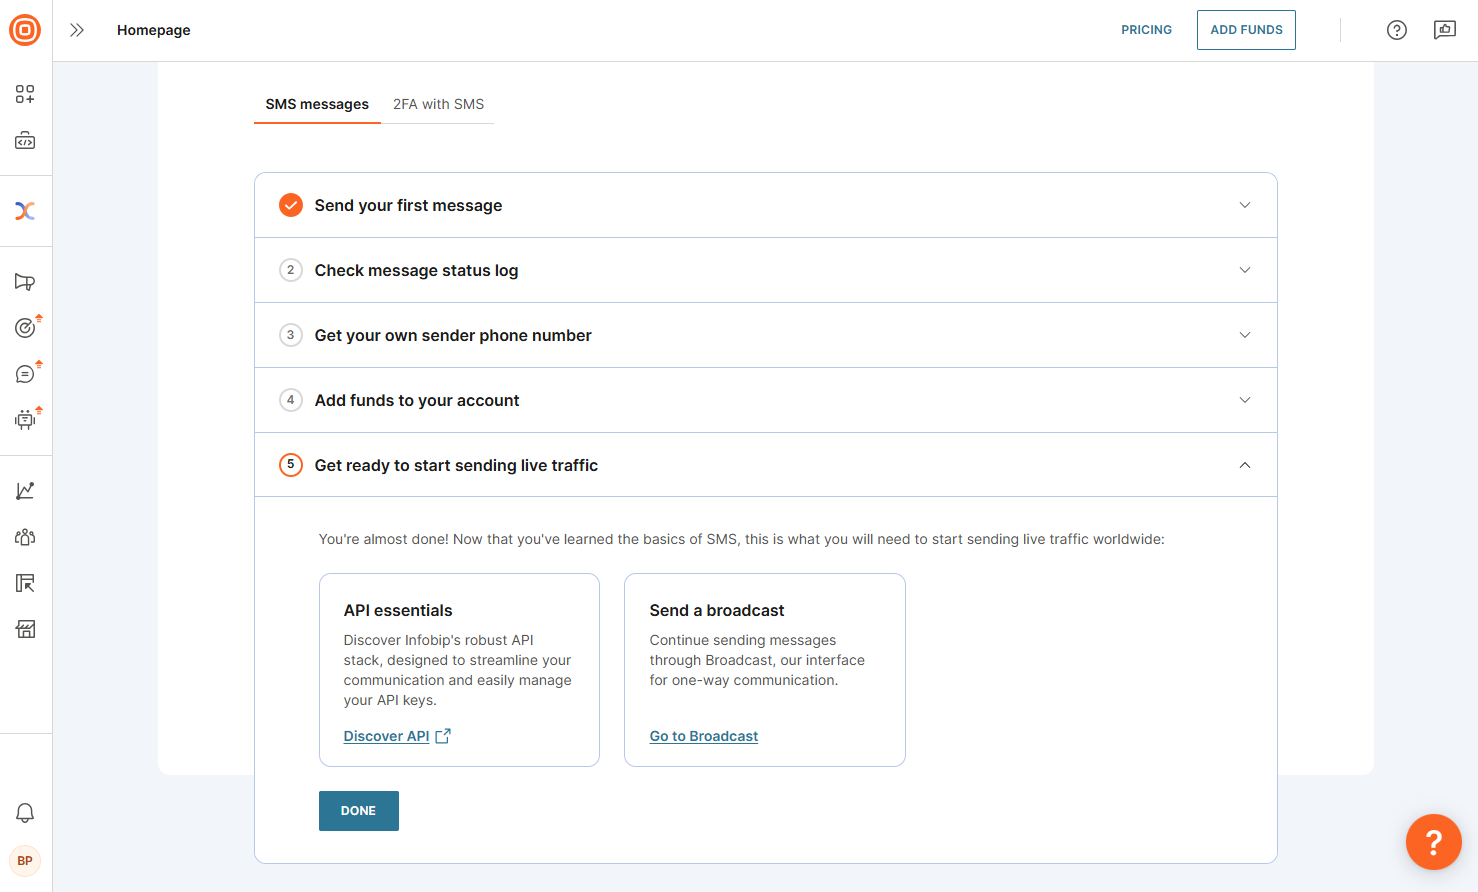
- When these steps are complete, you are ready to start sending live traffic.
2FA with SMS [#2fa-with-sms-start-using-sms]
Use this solution to send and verify one-time passcodes (OTPs). On the 2FA with SMS tab:
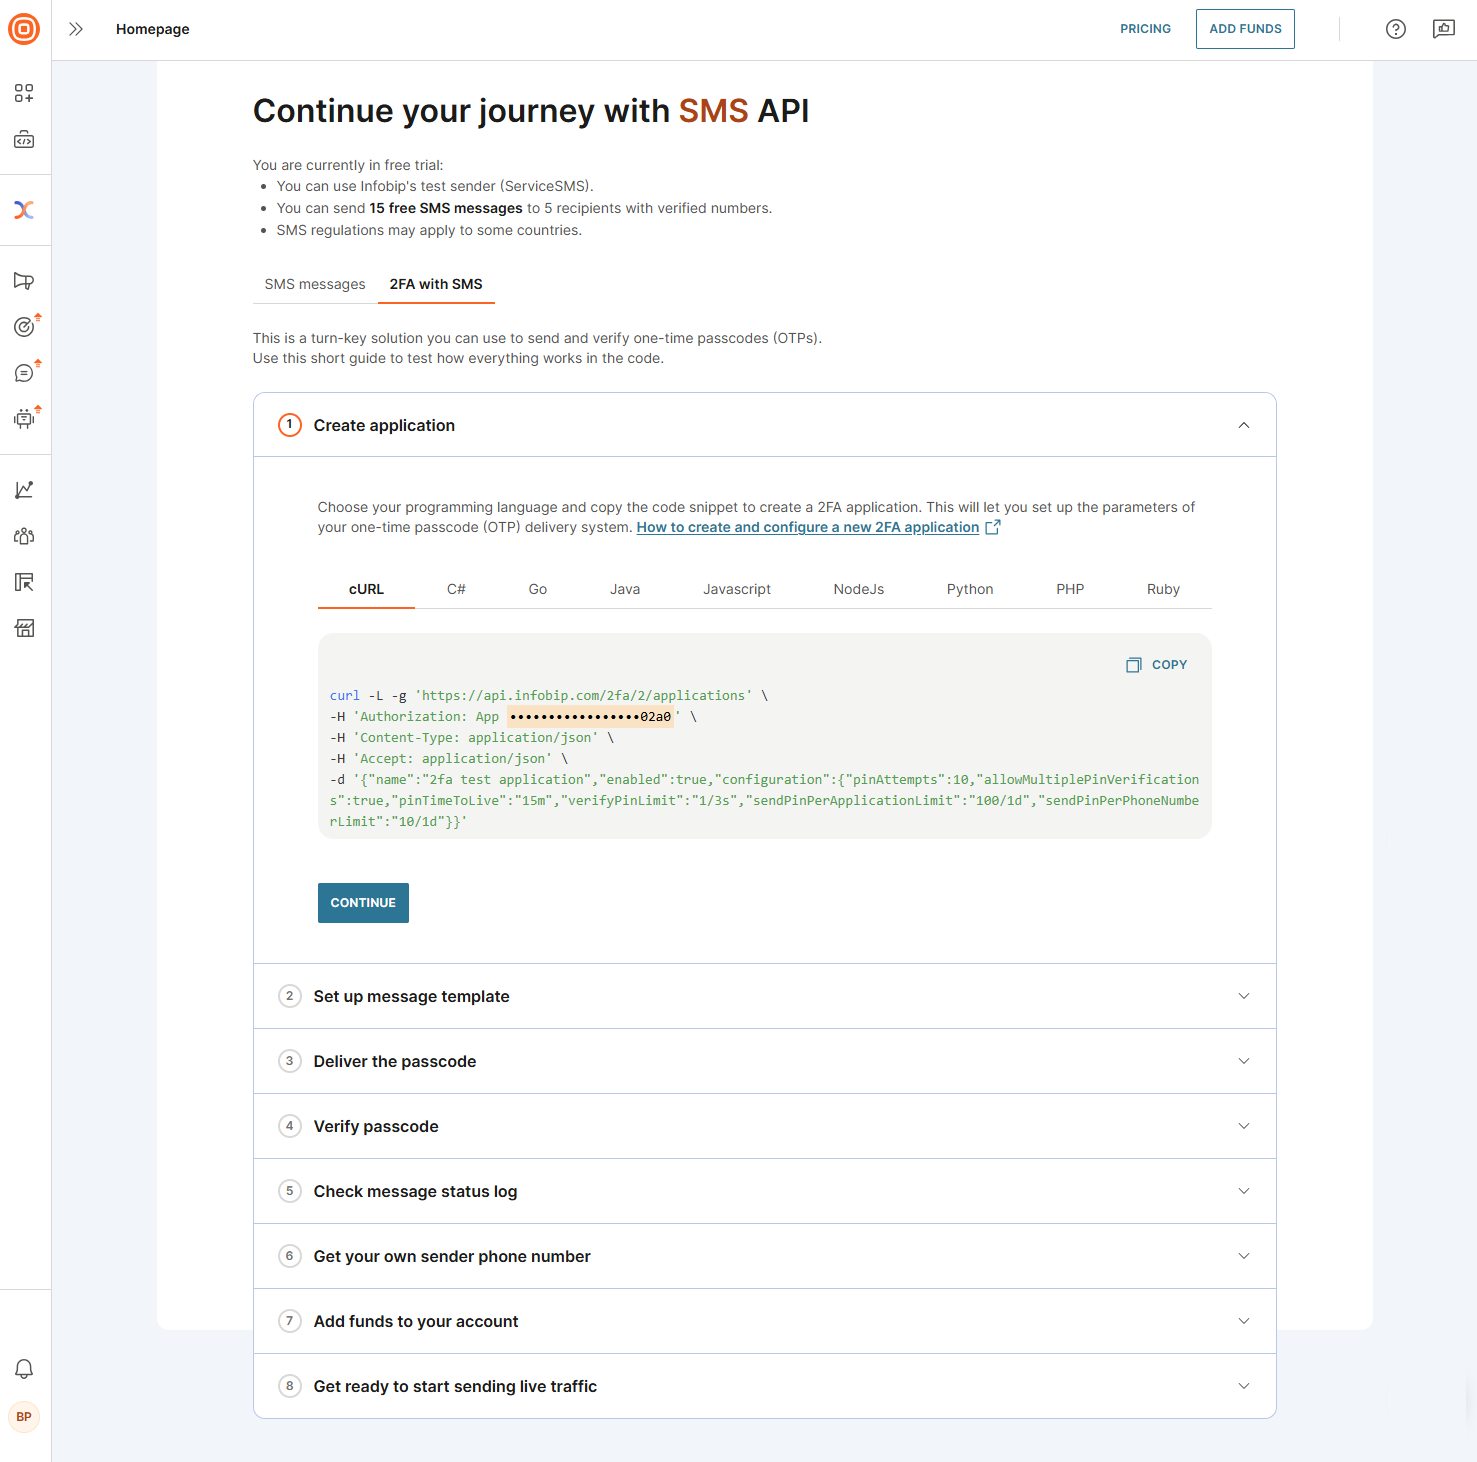
- Create your 2FA application. Choose your programming language and copy the code snippet to create a 2FA application. This enables you to configure the parameters of your one-time passcode (OTP) delivery system.
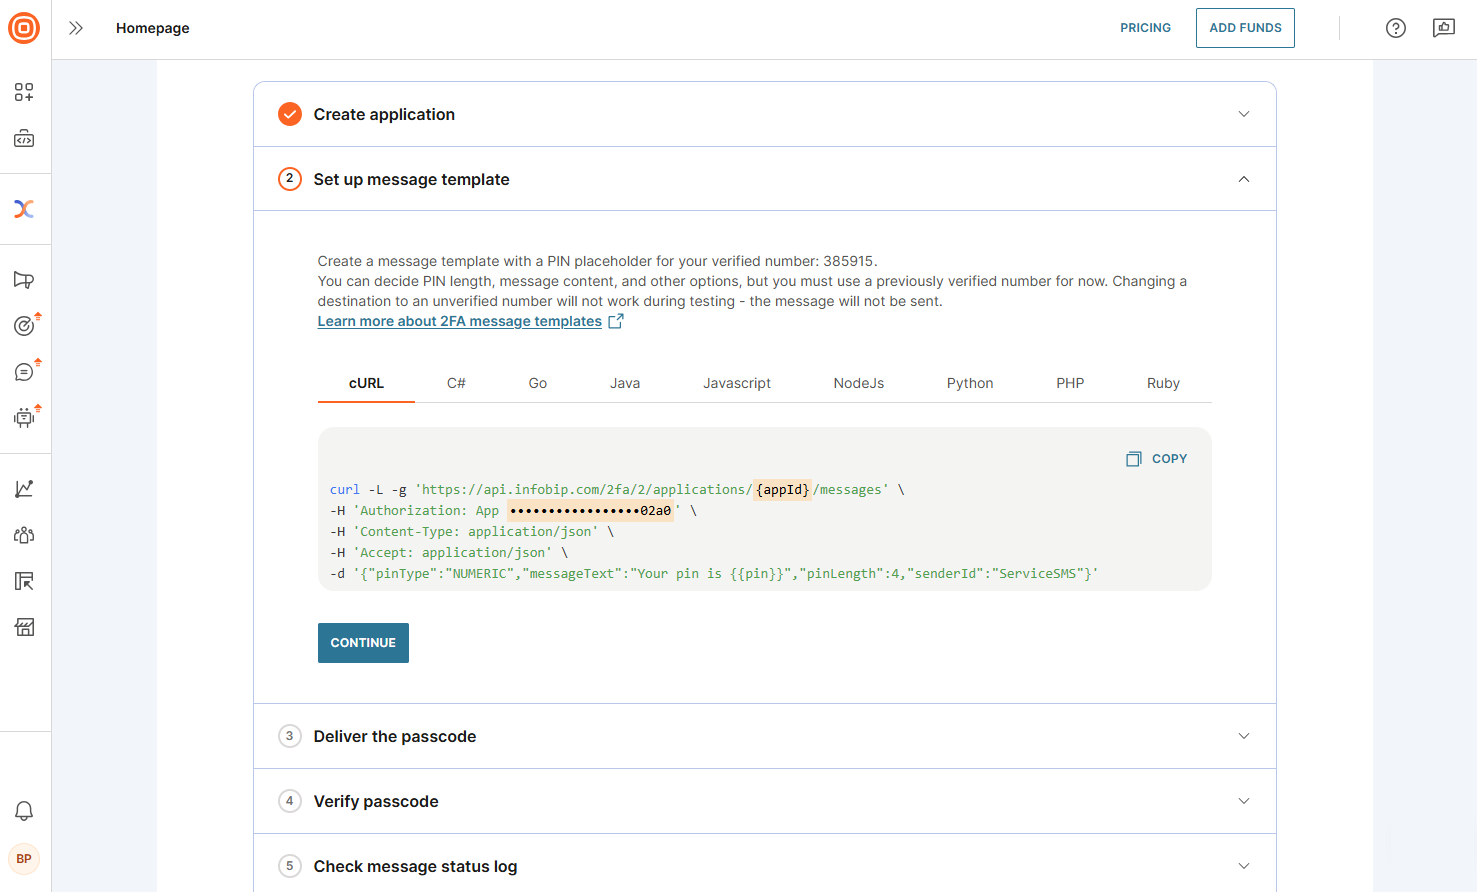
- Set up the message template. Create a message template that includes a PIN placeholder for your verified number. You can define the PIN length, message content, and other details, but the number must be verified beforehand.
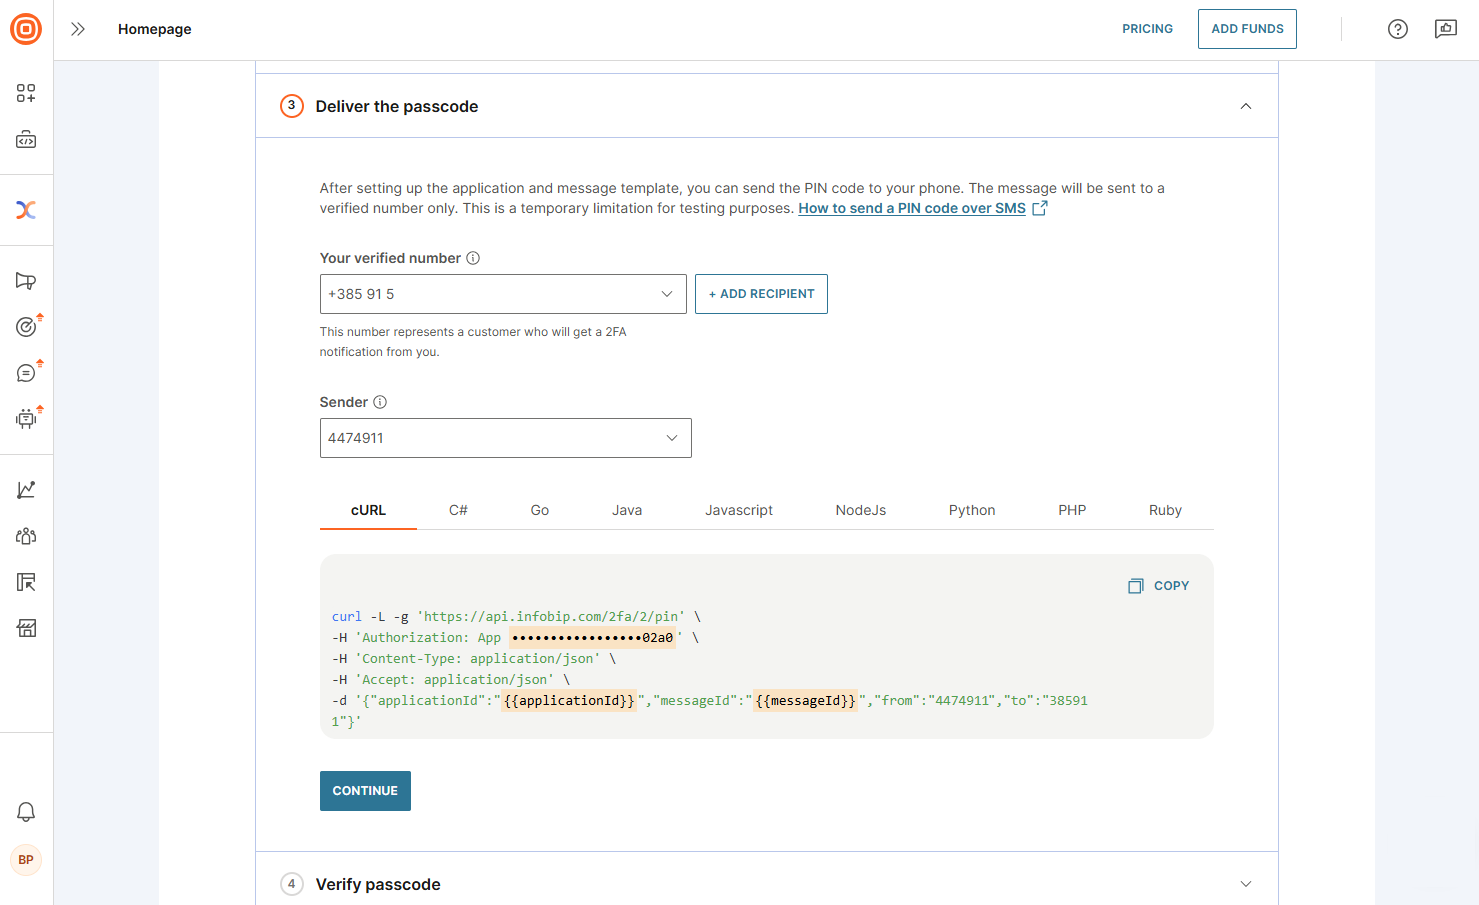
- Deliver the passcode. Once the application and message template are set up, send the PIN code to your phone. The message is delivered only to a verified number.
- Verify the passcode. Use the
pinIdfrom the previous step to verify the PIN code that was sent to your phone.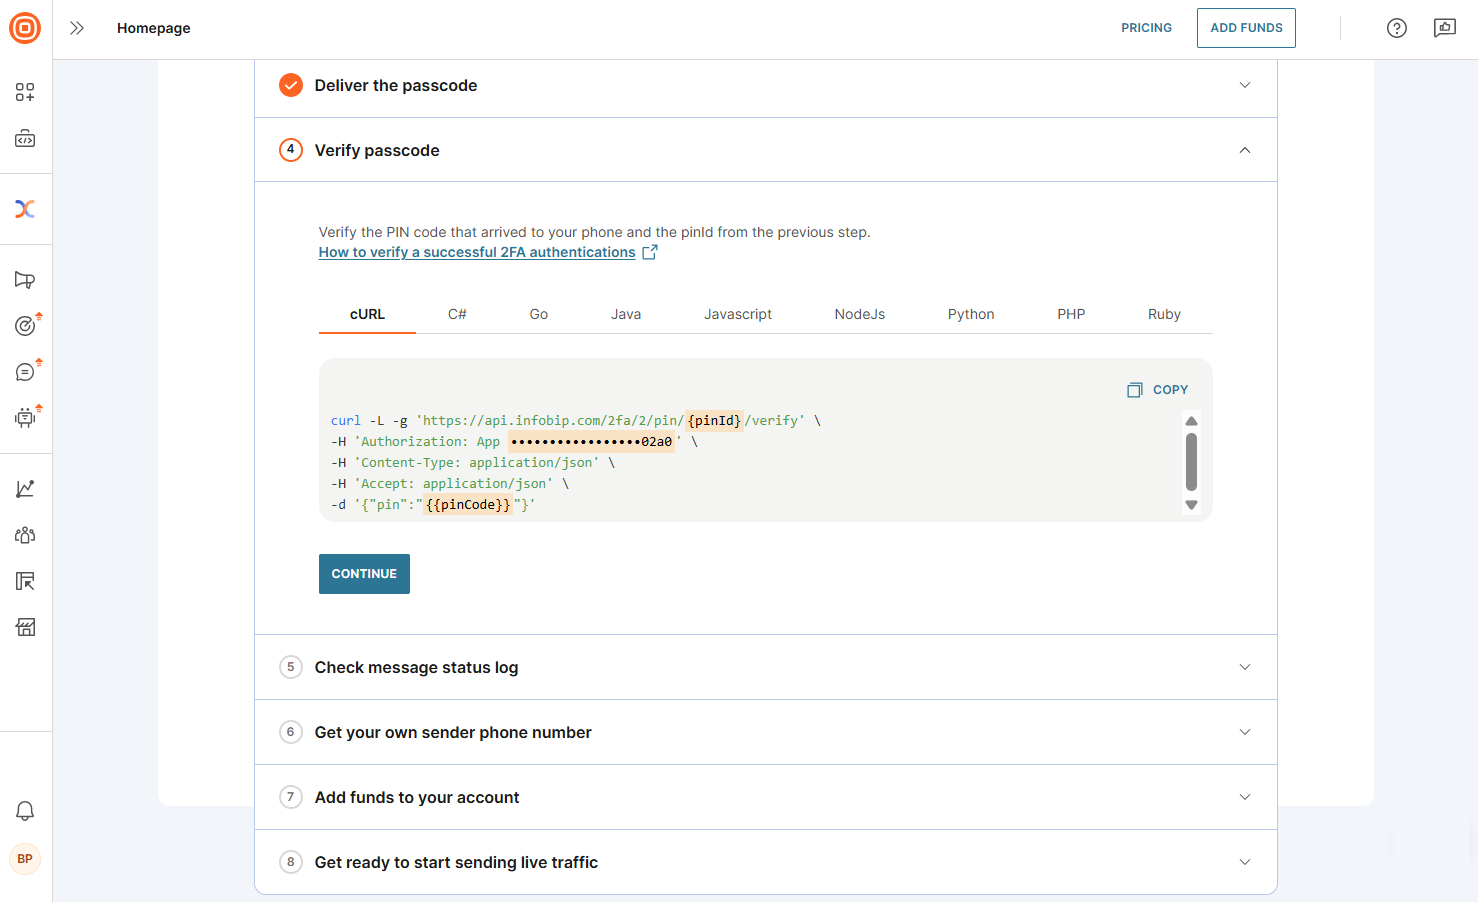
- After completing these steps, you can view the message status log, obtain your own sender phone number (mandatory step for sending live traffic), and optionally top up your account. If delivery fails, review the response status and error codes to identify the issue.
- When these steps are complete, you are ready to start sending live traffic.

Upgrade to a paying account [#upgrade-to-a-paying-account]
When you are ready to use SMS for your business communication, you can upgrade to a paying account. Select the Add funds option at the top of the page and choose a billing option. When you add funds to your account balance, it is no longer in the free trial mode.
If your free trial has ended, a banner appears at the top of your homepage. You can add funds by selecting Upgrade now, enabling you to continue sending messages to your customers.
Numbers and senders
Choose and configure your SMS sender identity.
Set up your SMS sender
Buy a number or request an alphanumeric sender for your SMS communication.
Send and track
Understand how messages are structured and delivered.