Email in Inbox
Use Email in Inbox to reply to customer emails directly from the agent panel.
Two-way email communication is available in Inbox. Both customers and agents can initiate an email conversation.
Emails within any conversation contain the following information:
- Sender's name
- Sender's email address
- Email subject
- Email body
- Email attachments
- Day of the week, date, and time the email is received/sent
Additionally, you can use these actions when handling emails:
- Reply to email - use it to send a reply
- Forward email - use this to forward the existing email to another recipient
- Show original email - hidden behind the ellipsis, providing an overview of the email in HTML, TEXT, and SOURCE
Moreover, an option to expand and contract an email card in conversation history is available and visible with an arrow icon.
Get started with Email in Inbox
To set up Email in Inbox:
- In the web interface, go to Channels and Numbers → locate and select the Email card.
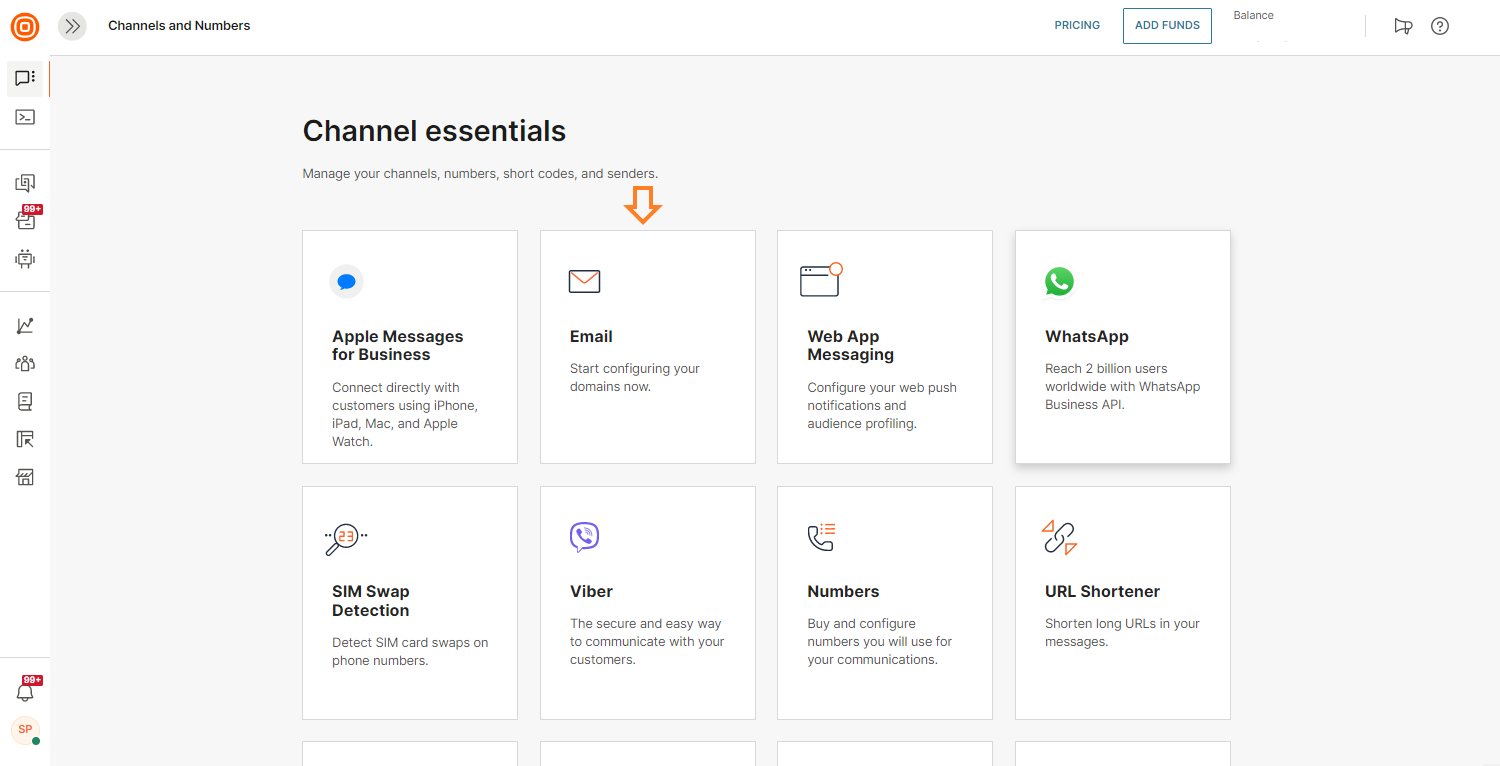
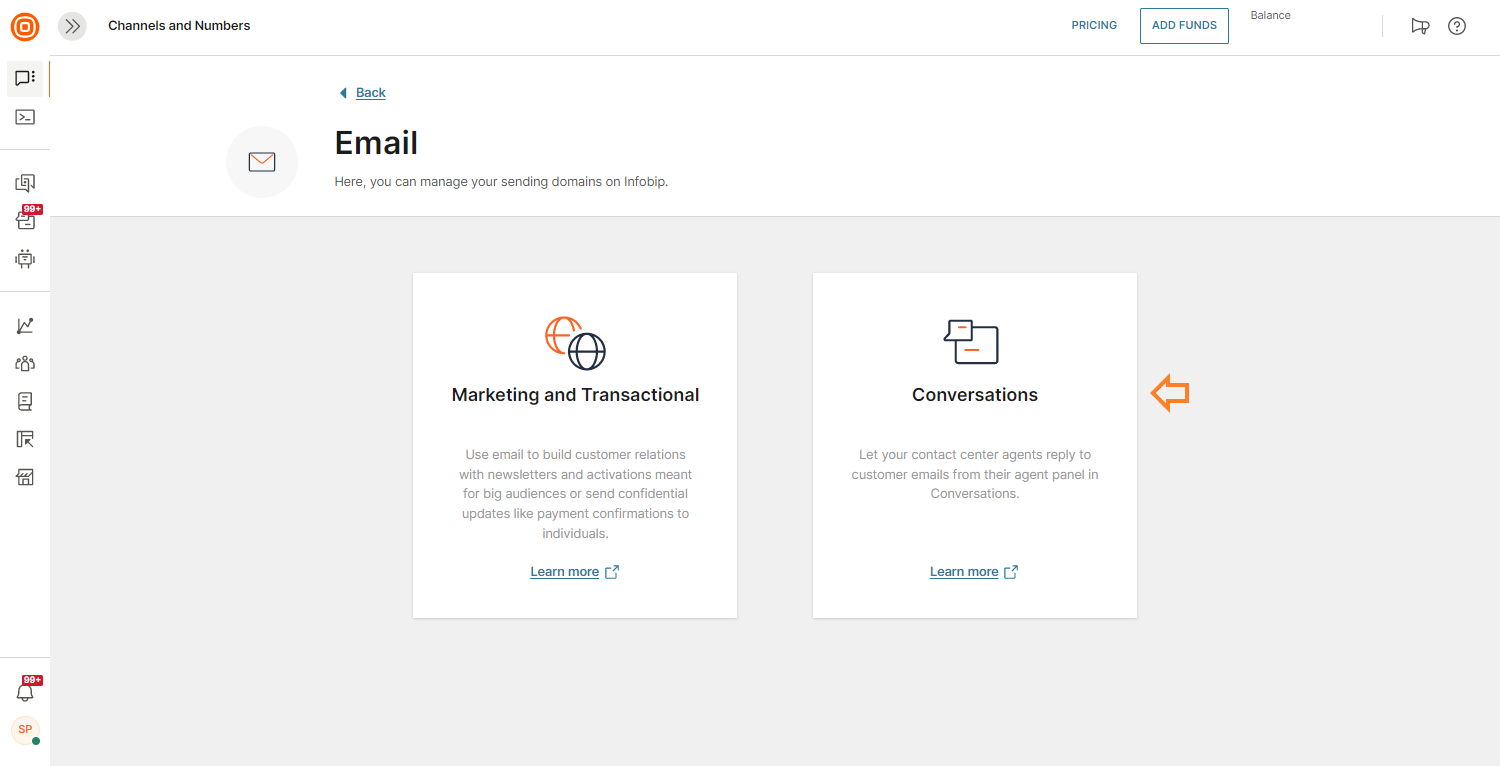
- In this window, you have two options: Marketing and Transactional, and Conversations.
- Choose Conversations.
- Configure your email setup to enable you to email customers directly from the agent panel. Additionally, you can configure the possibility to add previous messages, including threads, into replies.
- You can choose between:
- Custom sender
- Infobip sender
- Other settings
Custom senders
To use the Custom senders option, you need to own the domain for registering senders.
If you do not have your own domain, you will need to purchase and register it from a domain provider before adding senders or go back and choose to use Infobip senders instead.
If you use the Infobip domain to register a new subdomain, you can add senders (unlimited) to that domain.
To add a custom sender:
- In the web interface, go to Channels and Numbers → locate and select the Email card.
- In this window, you have two options: Marketing and Transactional, and Conversations.
- Choose Conversations.
- You need to own the domain that will be used to register senders to.
- If you already own such a domain, select Add sender.
- If you do not own a domain or do not want to use this type of sender, go back and choose to use Infobip sender instead.
- If you want to use more formal communication, use the Replies will include the sender's name option and enter your brand name as the sender.
- Enter the name of your custom sender domain. You can choose to use either the sender name in all emails or use your name. This displays your real name for every outbound email you send to customers, for example, 'David Smith'.
Using your real name strengthens the personal communication with your customers.
As you complete each step, a checkmark appears next to the item.
- Enter the sender name. This name appears in replies.
- Define Inbox email address - use this email address to receive emails on Inbox from your domain. Do not use this email in communications.
- Set up forwarding - go to your email provider settings panel and enter the Inbox email address you created in the previous step as a forwarding address. The system forwards every email sent to your domain to the Inbox agent panel.
- Verify forwarding of incoming verification - Enter the email address you used to set up forwarding from.
- Select Verify forwarding to receive a test email. The system sends the test email to the agent panel in Inbox.
- Outbound verification - to be able to send outbound emails, confirm the domain ownership by creating a TXT record and then entering it into your domain's DNS settings.
- Enter your domain and select the Create record button.
- Once the DNS records have been generated, select the Export Records button to export these.
- Then, proceed by adding them to your domain settings.
- When done, come back to the Infobip web interface and select the Verify button to verify the DNS records. Note that it can take up to 48 hours for these to be verified.
For more information about managing DNS records, see the GoDaddy guide on managing DNS records.
Also, the Custom senders list shows the status of your senders:
- Verified (green) - Inbound and outbound verification done
- Unverified (red) - Inbound and outbound verification still pending
If your sender status is still pending, select the sender name, and in the verification window, you can try resending the test email and check the All Work panel for that email to verify your sender. These statuses apply to custom senders only.
Send email
You can send emails in two ways:
- When you want to initiate a new conversation and send an email to the customer, select the Start a Conversation button.
- When sending an email from an existing conversation, select either Reply or Forward or use the New email button at the bottom of the page.
You can add up to 1,000 recipients across the To, CC, and BCC fields combined. The email subject line can contain up to 1,000 characters.
Common editing options are available while writing an email, along with the ability to send attachments up to 25MB.
To make reading and writing emails easier, contract the right-hand pane containing context cards to provide extra space. You can also take over emails by selecting the take-over icon.
If you get distracted from writing an email because you are working on different tasks, the system stores a draft in the Email drafts tab.
When a BCC recipient replies to an email in a conversation, the system starts a new conversation. The system also creates a new conversation each time you forward an email to separate the existing communication from the new one.
Emails are always ordered from newest to oldest: the latest email is shown at the top of the agent panel but you can view the older threads by selecting the arrow next to the three-dot menu.
You can also use the draft option while forwarding an email. During forwarding, select Edit draft to edit your email.
Supported email attachments and templates
In the Email channel, you can send the following attachment types:
| File type | Supported formats |
|---|---|
| Image | jpeg, bmp, gif, png, tiff, svg, webp, heic, icon |
| Video | avi, x-msvideo, mpeg, quicktime, mp4, webm |
| Audio | wav, mpeg, ogg, mp3 |
| Documents | pdf, msword, vnd.oasis.opendocument.text, plain |
| Spreadsheets | vnd.oasis.opendocument.spreadsheet |
| Archives | zip, x-gzip, 7-zip |
| Email files | edb, eml, emlx, ics, mbox, msg, oft, olm, ost, pst, rpmsg, tnef |
| Other | xml, json, text/html, vnd.oasis.opendocument.graphics, octet-stream, pcap, p7s, vcf, pem |
Email formatting
Use formatting options such as text formatting, bullet points, and inline images to create professional email responses.
Once you start typing an email message, you see the following rich formatting options:
- Strikethrough
- Subscript
- Superscript
- Font Size
- Text color
- Background color
- Clear formatting
- Order list
- Default
- Lower Greek
- Lower Roman
- Upper Alpha
- Upper Roman
- Unordered list
- Default
- Circle
- Disc
- Square
- Paragraph
- Align left
- Align right
- Align center
- Quotes
- Increase indent
- Decrease indent
- Insert link
- Insert image
Merge email conversations
You can merge conversations from different customers into a single conversation based on, for example, a common topic. Merging two email conversations combines their references, ensuring that the system automatically maps any further replies to the remaining conversation.
When using the Reply to all option in a conversation with merged messages, the recipients only match the last message or the message you are replying to.
Recipients are not populated from all messages in the conversation. To make sure the message reaches all participants, add them as recipients before sending the reply.
To merge conversations:
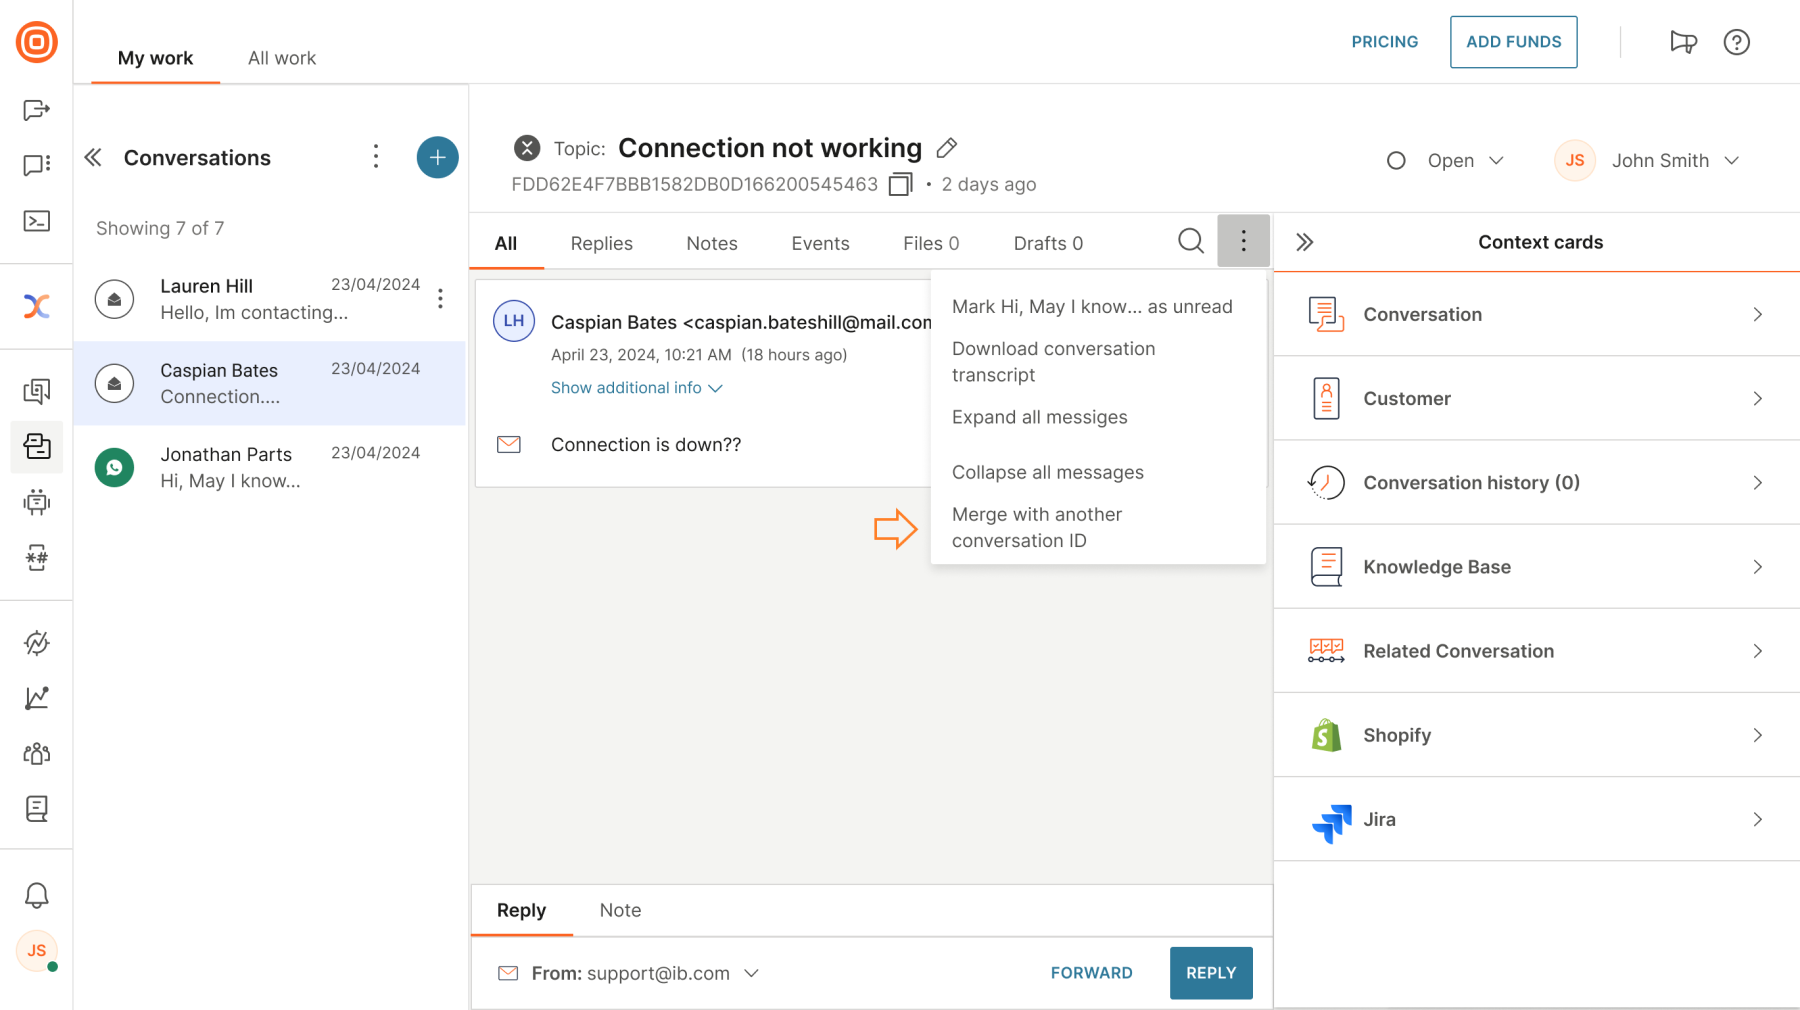
- Choose one conversation as the primary thread where all information is consolidated.
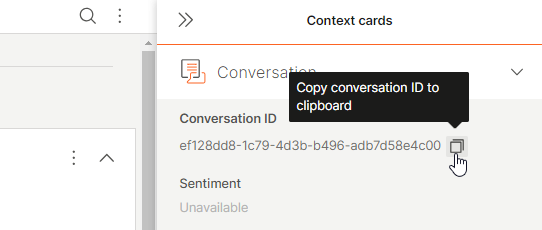
- Copy the Conversation ID of the conversation you want to merge with the main one. Copy the conversation ID from the Conversation context card, not the Short ID.
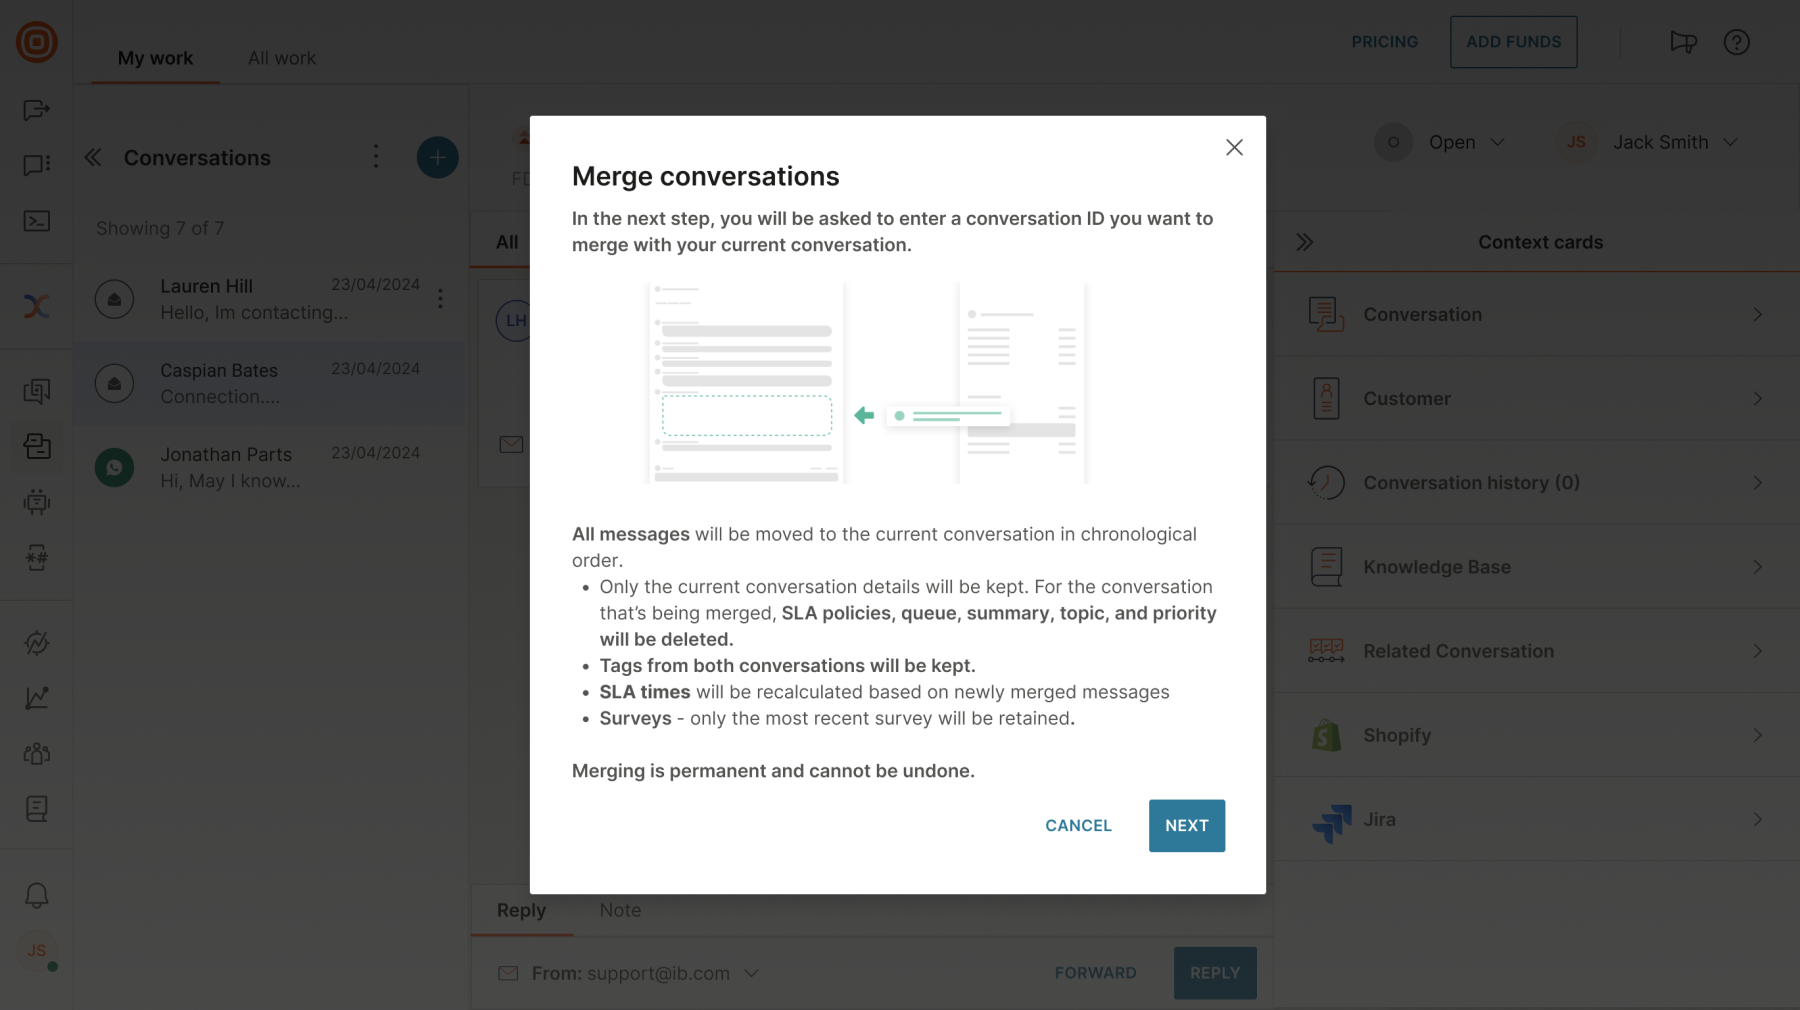
- Go to the main conversation, select the three dots, and select Merge with another conversation ID.
- Select Next after reading the explanation of what happens if the conversations are merged.
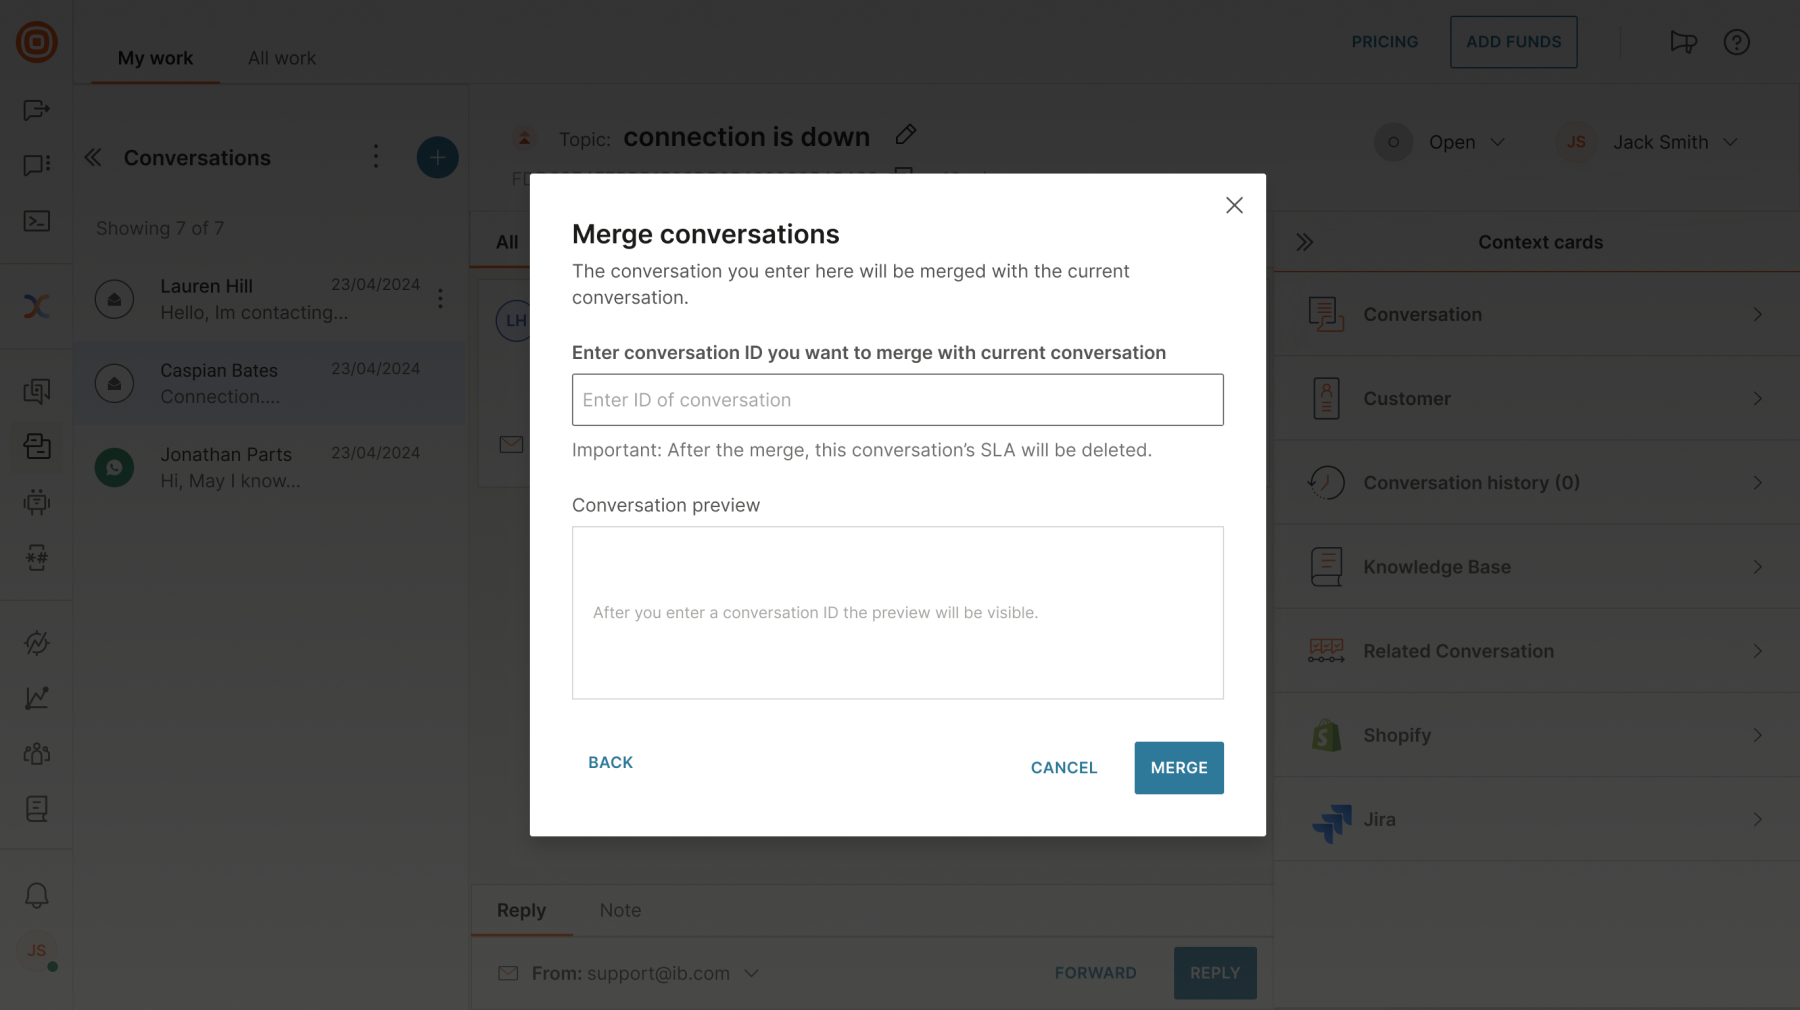
- Then, enter the conversation ID you want to merge with the current conversation.
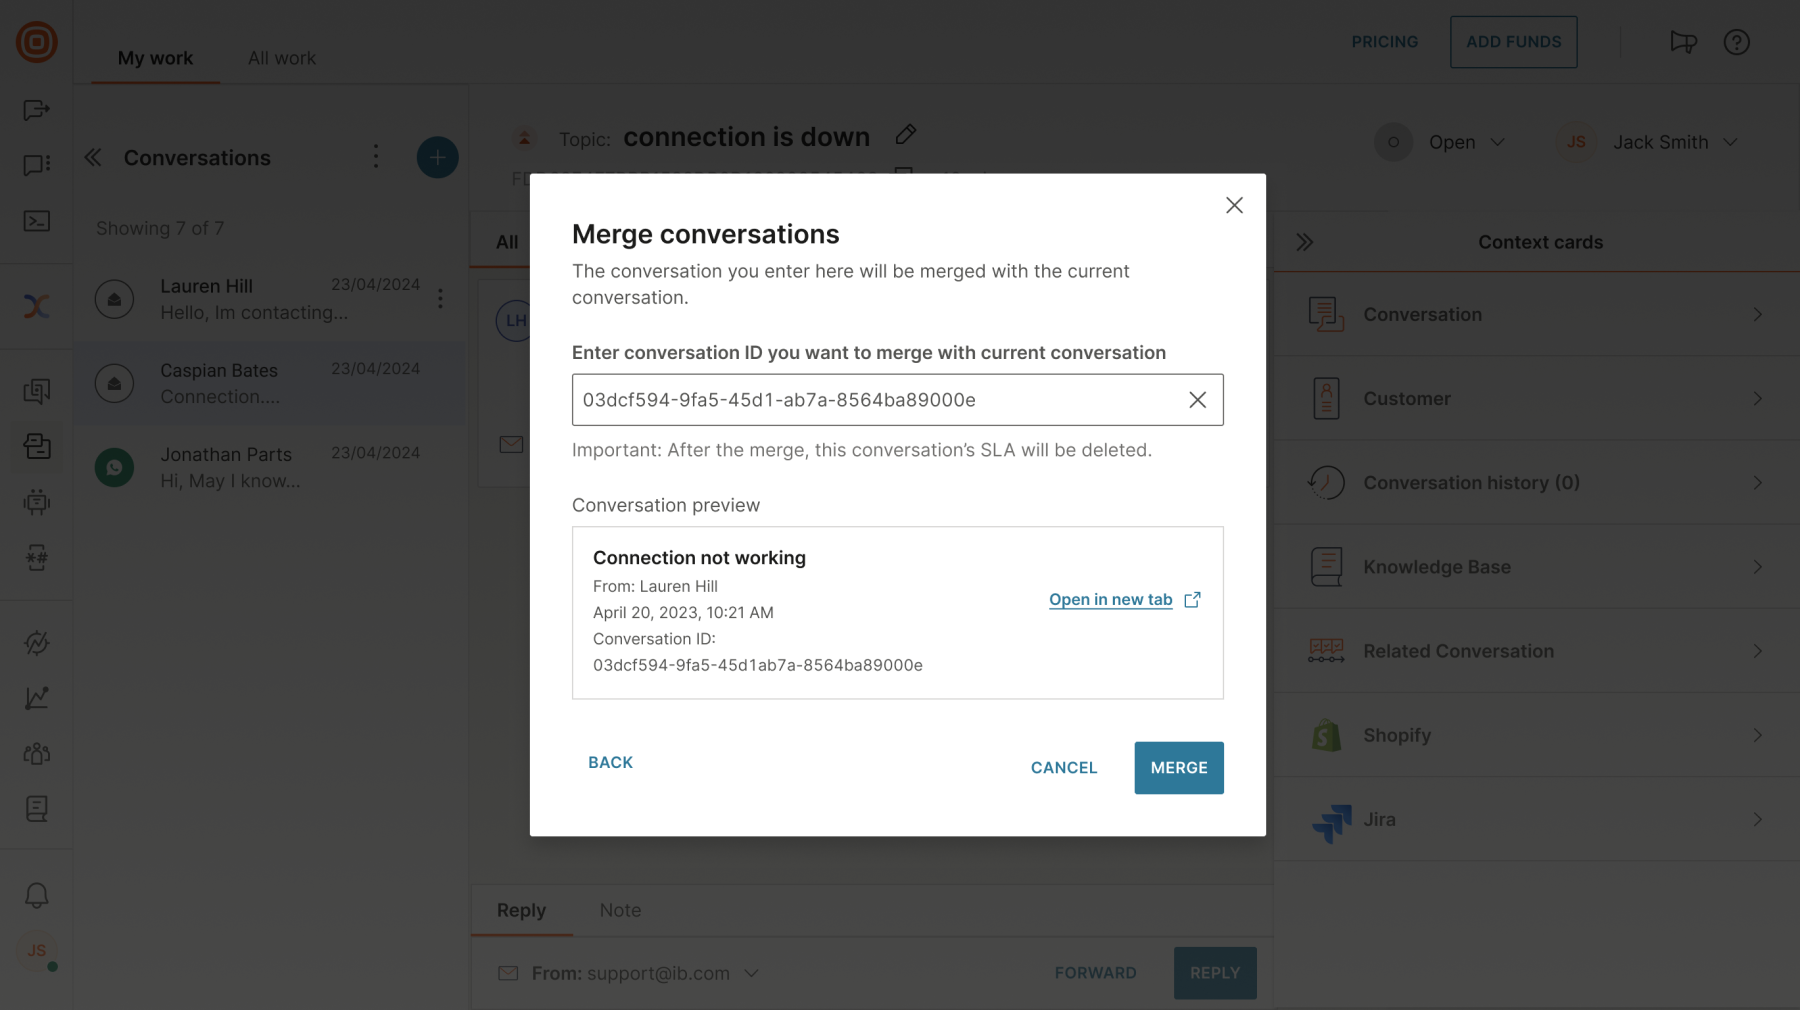
 6. Once you enter the conversation ID, you see the conversation preview with the option to open it in a new tab. If everything is correct, select Merge.
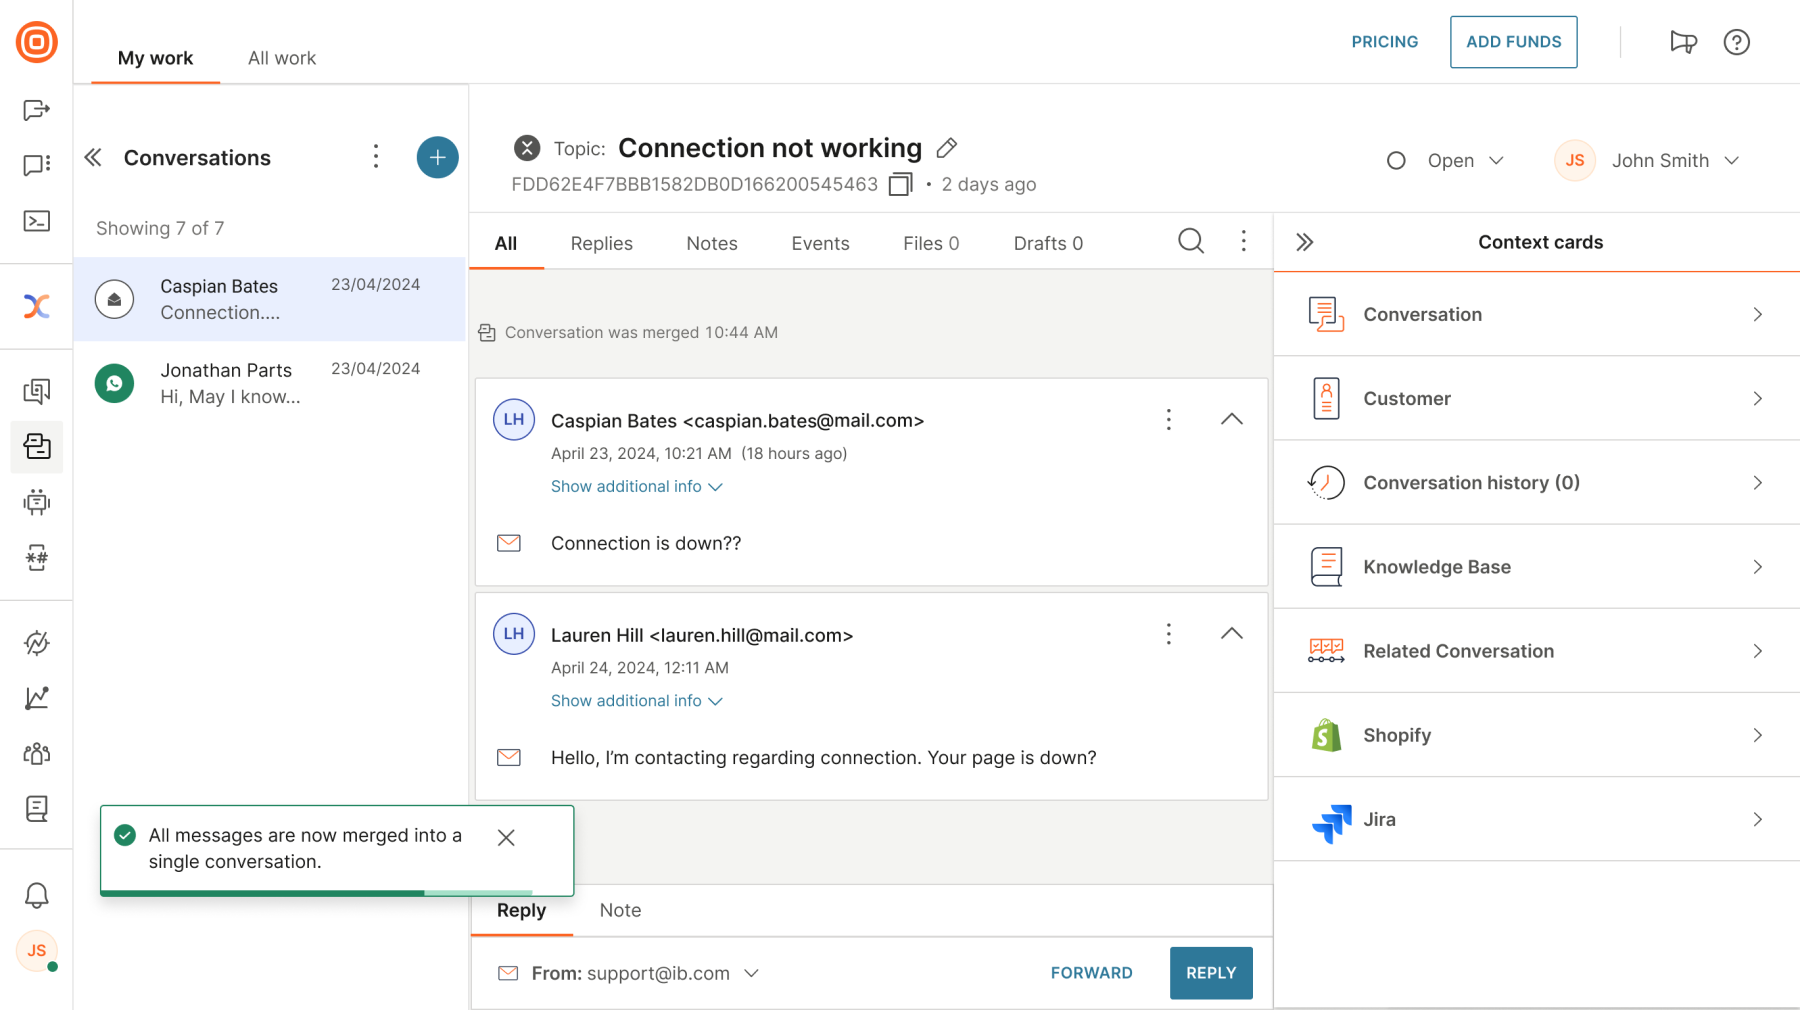
- After a successful merge, you see the All messages are now merged into a single conversation. message. The system automatically routes any further communication from the merged conversations into the primary conversation. The merge action deletes the secondary conversation.
Merging email conversations between registered email senders is not recommended.
Email message delivery report
Message delivery reports help you track delivery statuses for every communication participant accurately.
For every sent message, the agent receives a tooltip with the message delivery status for each recipient ('Failed to send' or 'Email sent').
This feature lets you quickly see if the message was successfully sent or failed, eliminating any uncertainty regarding message delivery.
Email threading
When the system receives an inbound email, it checks if that email belongs to an existing thread. Different behaviors of different email servers and email clients used by customers impact the parameters sent along with each inbound email.
To bypass those limitations, incorporate email threading by using these four parameters:
- Reference ID stored in the header of the email
- Reference ID stored in the email body
- Recipient list
- Email subject with prefixes such as "Re:", "Fw:" and their localized version stripped
The system checks these parameters and if at least two match, it considers the inbound email a continuation of an existing thread.
Outbound emails
You can enrich outbound emails with placeholders and simple templating language. Every outbound email can use a template that the system applies before sending the email to the end user.
To access this feature, go to Inbox → Settings → Channels → Email.
Outbound email components
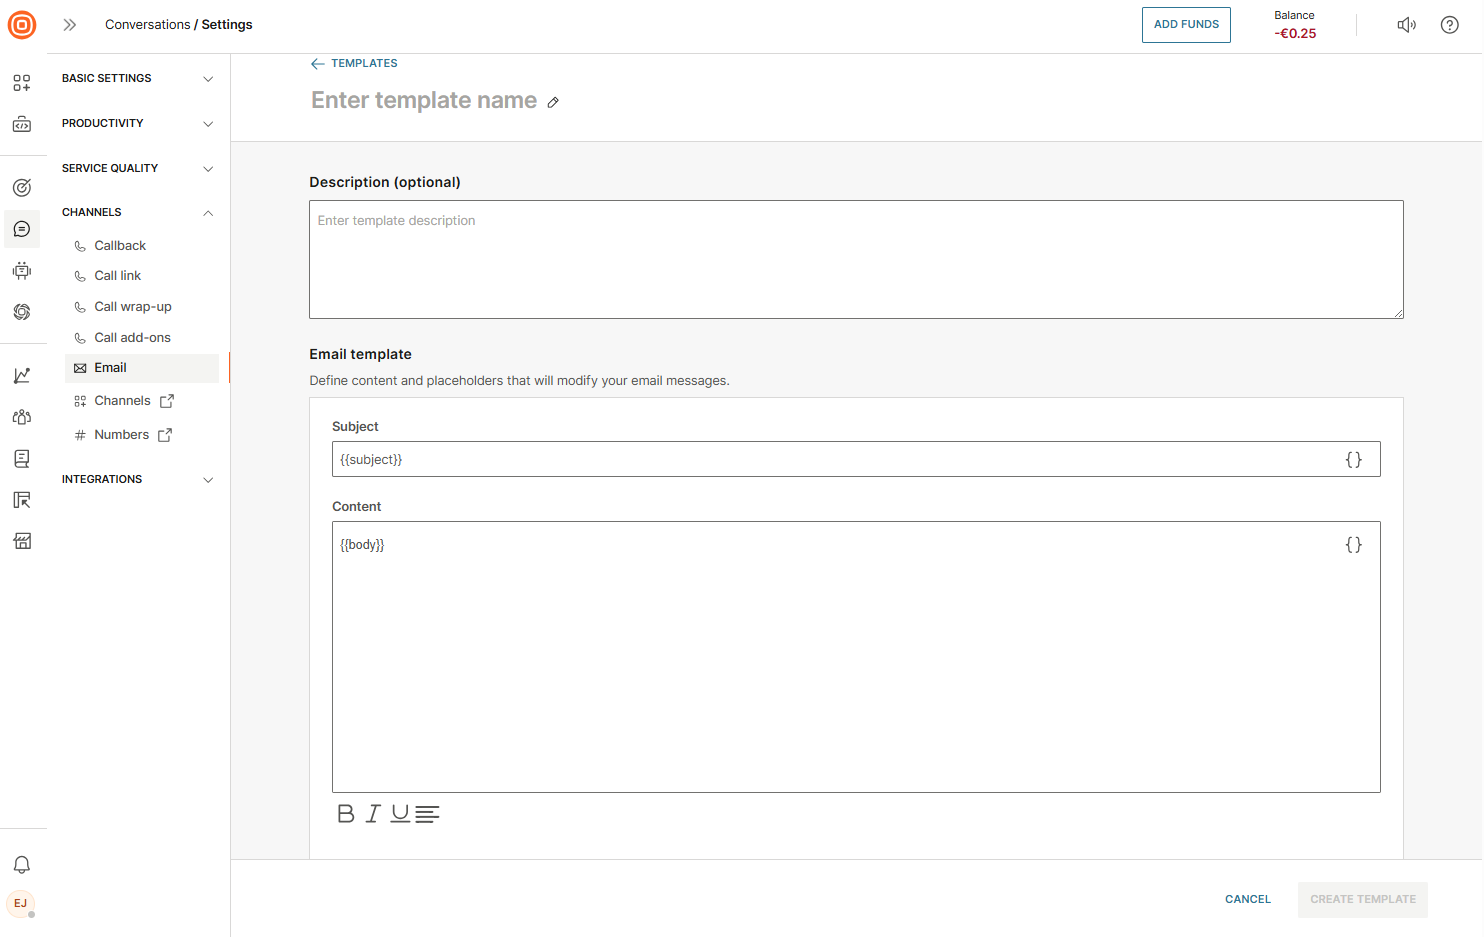
- Templates
- To create and manage multiple templates, go to Inbox → Settings → Channels → Email → Templates.
- Select Create email template.
- Each template requires a name (and optional description).
- Templates include a subject and content.
- Agents can edit these fields and insert placeholders from the standard placeholder picker used throughout Inbox.
- Common use case: defining an email signature that the system automatically applies.
- Templates can be saved, edited, deleted, or searched in the template list.
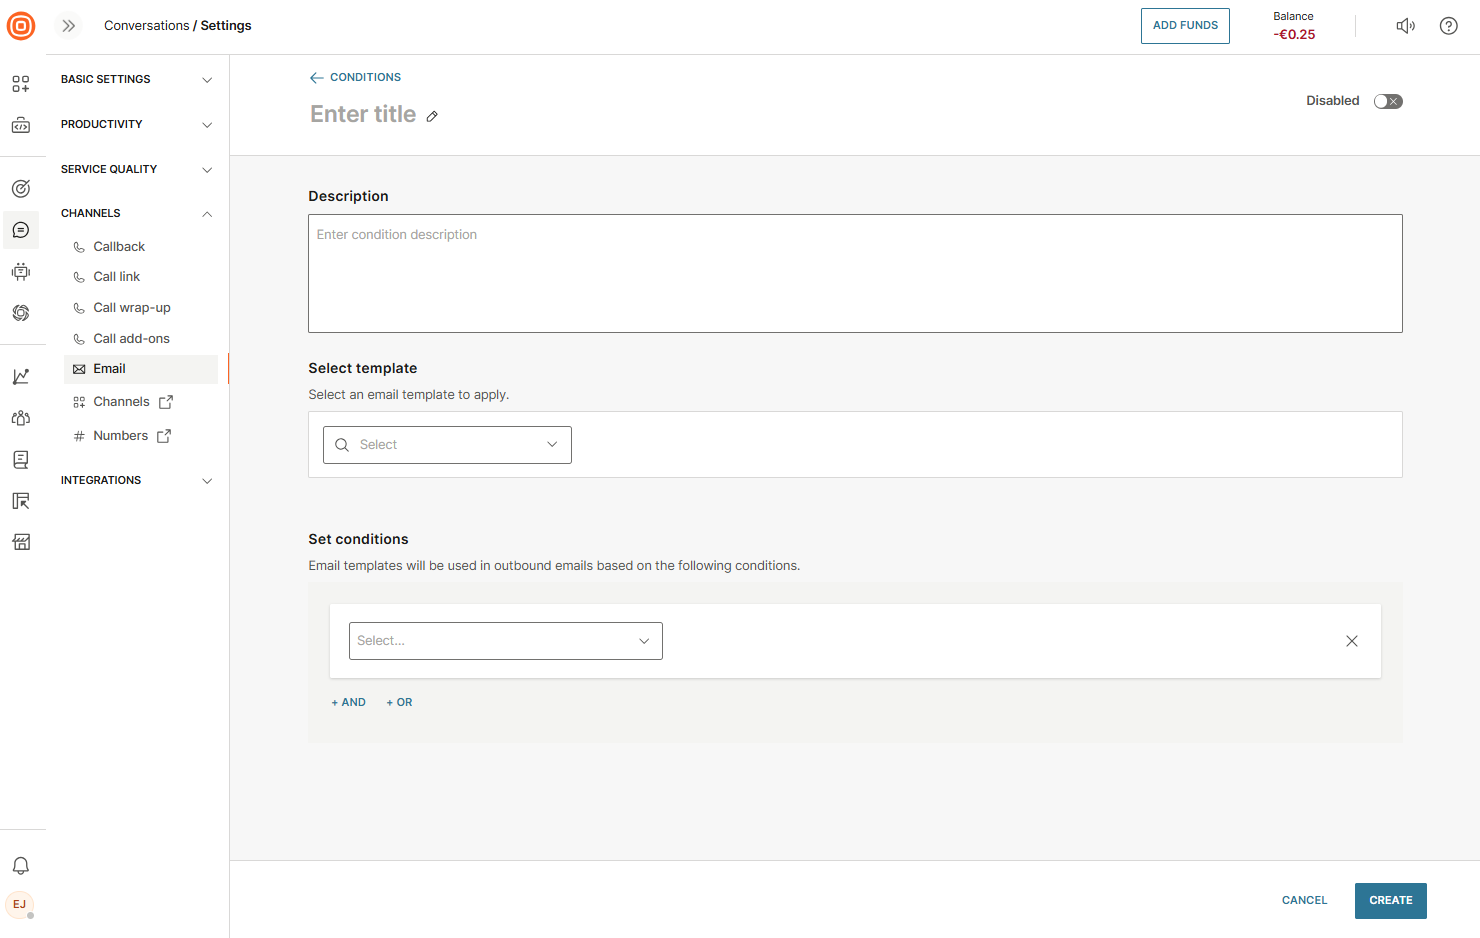
- Conditions
- To create and manage multiple conditions, go to Inbox → Settings → Channels → Email → Conditions.
- Select Create condition.
- Each condition includes a title, optional description, a linked template, and logical operators (AND/OR) for rule building.
- Conditions can be enabled or disabled using the toggle at the top right.
- Example: The Sender condition applies templates based on the sender email set in a specific queue. The system automatically applies the same automation and routing logic to any new emails added to that queue.
- Created conditions appear in the conditions list, where they can be edited or deleted.
- Threading
- To create and manage email threading, go to Inbox → Settings → Channels → Email → Conditions.
- When an agent replies to a customer's email, they can include previous messages in the thread for context. Agent's permissions can be configured to:
- View and edit threads
- View threads
- Threading ensures transparency and continuity. Anyone added to the conversation later sees the full email history, helping resolve issues more efficiently.
