Use Call Link
The Call Link feature enables efficient support scenario implementations without the need to be physically present in the same room. Call Link allows end users to be connected with a predefined destination without the need to develop an end-user application.
You can have a video or audio chat with your end users in just a few clicks. From the Infobip web interface or with a simple API call, you generate a short URL that you share with your end users over messaging sessions, emails, or even on your website. Once the end user clicks this URL, a browser window opens and connects the end user to the predetermined destination. This browser window can be branded by leveraging templates that include elements such as text messages, colors, and logos to be displayed on the web page.
Supported destinations [#supported-destinations-call-link]
When you create a link to share with the end user, you need to predefine the destination that will be contacted once the end user starts the call.
The following destinations are available:
| Destination type | Description |
|---|---|
| WebRTC | The identity of a WebRTC user to whom this call should be routed. This means that you have implemented an application (web or mobile) making use of our WebRTC SDK where this WebRTC identity can be reached. Note that your WebRTC-based application must be based on our RTC SDK 2.0 or above. Call Link does not support interaction with RTC SDK 1.x. The link allows connecting only one caller to the predefined destination at a time. |
| Phone | The destination phone number that will be called and bridged to the Call Link user. When using this destination, you can enable the dialPad option in the Call Link configuration callOption section. This enables the availability of a dial panel during the call with which the end user can interact with DTMF-based systems, such as IVRs. |
| Room | The conference room name where all users who click the generated link will be connected. Rooms can optionally be password protected by a user-defined password. A chat feature can be enabled in the Call Link configuration to create links to ROOM. |
| Conversations | The call will be routed to Conversations. By default, this inbound call to Conversations will follow the defined routing and waiting strategies to direct the call to an available agent. |
| Application | The call will be routed to your own application based on our Calls API platform. Your application can use Calls API methods to answer this incoming call and bring it in any communication flow you implemented. |
Call Link domain and subdomains [#call-link-domain-and-subdomains-call-link]
All generated Call Links are created by default under the domain name "call-link.com". A Call Link looks like this: https://call-link.com/r9wpIY.
You may request up to a maximum of three subdomains for Call Link, such as support.call-link.com", sales.call-link.com, mycompany.call-link.com. Subdomains can be requested and managed from the Infobip web interface or through the API. The availability of a new subdomain when requesting one cannot be guaranteed.
To use a subdomain when generating Call Links:
- Request a Call Link subdomain through the Infobip web interface (Call Link application, under the WebRTC channel application)
- Create a Call Link configuration and include the subdomain ID in that configuration
- Any Call Link that is generated based on that configuration will be generated under the associated subdomain
If you delete a subdomain for which there are still active Call Links, then these Call Links will be automatically invalidated by our system.
Supported WebRTC features [#supported-webrtc-features-call-link]
The following WebRTC features are available to the Call Link end user based on features enabled from the Call Link configuration:
| Feature | JavaScript SDK (Desktop) | JavaScript SDK (Android) | JavaScript SDK (iOS) |
|---|---|---|---|
Control audio | |||
| Mute / unmute | ✓ | ✓ | ✓ |
Control video | |||
| Start / stop video feed | ✓ | ✓ | ✓ |
| Switch front / back camera | x | ✓ | ✓ |
| Start / stop screen share | ✓ | x | x |
| Background blur | ✓ | ✓ Performance varies depending on hardware | ✓ Performance varies depending on hardware |
Managing Call Link configurations [#managingcall-link-configurations-call-link]
Before generating shareable links, create at least one Call Link configuration. Configurations can be created on the Infobip web interface under the WebRTC channel application or using the Call Link configuration API methods. In case you do not create any Call Link configuration, a default system one is used.
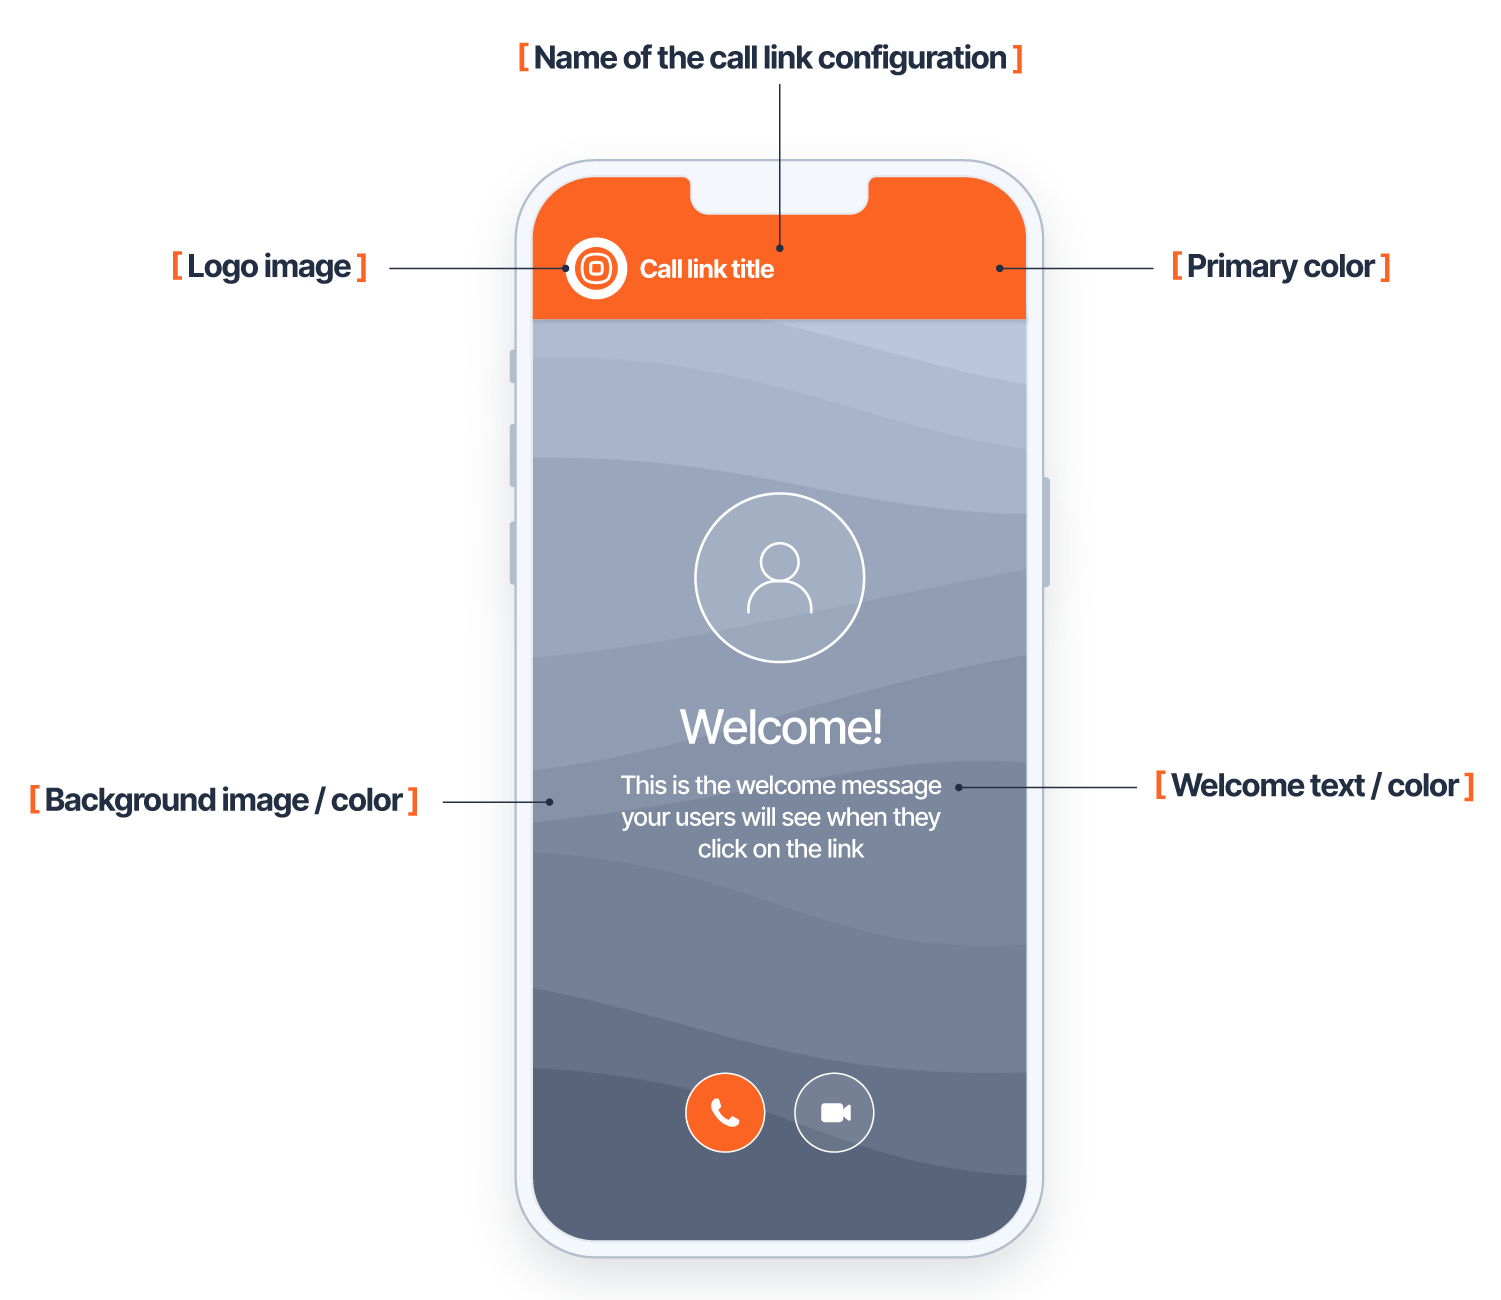
You can use the following elements to configure the Call Link:
- InitialOptions These are the options available to the end user when they open the Call Link page right after initiating the call. Here you can define whether all calls generated using this configuration can use audio and video, as well as which preferences would be activated for the camera (front/back) on mobile devices.
- CallOptions The options that the end user has during the active call, such as the ability to switch cameras, mute/unmute themselves or start a screen-sharing session.
- Theme
You can also define your own branding, that is, how the webpage will look to the end user.
A theme consists of the following types of elements:
- Images: The image that you use as a logo in the top left corner of the Call Link, plus a background image for the whole window. These two elements are optional, and the default icon and background are applied if you do not add your own. You must use the Call Link images API method to upload these images. When you upload an image, the request returns an id for that file, which is the reference used in the theming definition of your Call Link configuration.
- Messages: The text shown to the end user when they open the Call Link URL. You can define three different messages and these are presented based on the status of the link (active, inactive, or expired). See the following Generate a Call Link section for more information about allowed time windows and one-time usage. - The
_inactiveText_is shown to the end user when they click on the link. The link is considered inactive because the allowed_startTime_is not reached yet, thus the end user cannot start the call. - The_expirationText_is shown when the Call Link has expired, either because it is a one-time link that has already been used or because the allowed_endTime_has already passed. - Colors: Whether you choose to use a background image or not, you may also state your preferred color for various elements in the UI.
- Layout: The layout that should be applied when the Call Link session starts. When multiple layouts are defined, the first one in the list is activated at call start and the others are selectable by the end user from Settings. If one layout is specified, only that layout is available, and the end user cannot change it. If this option is skipped while creating the configuration, the standard grid layout applies and the end user cannot choose any other.
- Localization: Select the language in which system messages from Call Link should be shown on the Call Link user interface.
- If not specified, the default language is English.
- If set to
PRESET, a language can be defined out of a choice of 14, and that language will be applied for system messages. - If set to
BROWSER_DETECT, Call Link detects the language setting of the user's browser and if it is one of the 14 supported, this language will be used. If this is not part of the 14 languages supported, the default English language will be used.
- Webhook: You can ask the system to send you a status event to your designated webhook once a Call Link has been used. The status event reports information about the connected parties such as connection time and connection duration, and identifiers of recordings, in case the session was recorded. See the Call Link Webhook reference for a complete definition of the status event.
The following illustration provides guidance on the configurations. Colors are defined as hexadecimal values
Default Call Link configuration [#default-call-link-configuration-call-link]
You can set a default Call Link configuration, which means that this specific configuration is used when generating a Call Link URL when no specific configuration is defined. Note that you can set only one default configuration. Usually, the first configuration you created is considered the default.
Subdomains [#subdomains-call-link]
If you do not specify a subdomain during the creation of a Call Link Configuration, all Call Links generated out of this configuration will be under the main domain "call-link.com".
To leverage the ability to generate links under your desired subdomain, refer to the section "Call Link domain and subdomains" above.
Generate a Call Link [#generate-a-call-link-call-link]
A Call Link URL can be created from the Infobip web interface under the WebRTC channel application or via API with the related Call Links methods.
When generating a new Call Link URL over API, you have to specify:
- The webRTC identity and display name (that is, a full human-readable name) for the end user who will use the Call Link.
- This identity does not need to be declared in advance with the WebRTC token generation method, the Call Link platform will create this token for you. By defining this, you ensure that whoever is receiving this call (Conversations agent, or your WebRTC user in your WebRTC application) is able to correctly recognize and identify the calling party.
- If you omit these values, the end user will have to fill in his name before the call can be started. Use ROOM as the destination type when you want the end user to fill in their name before joining.
- When defining these values, and in particular the identity, you may additionally ask the system to hide the display name from the landing page so your end user can enjoy a cleaner user interface.
- The destination type and associated characteristics.
- The validity window for the generated URL. Here you can define whether this generated Call Link can only be used once, or multiple times. You can also define a start and end date/time between which this link can be used, as well as valid days and time slots within that validity period. For one-time usage, note that: - The usage counts from the moment that a call has effectively started. Opening the received URL without starting the call does not count as usage. - The one-time parameter does not apply when the destination is set to ROOM.
- The Call Link configuration that you wish to use to create the link.
You can omit the specification of a validity window when creating a new Call Link URL, in which case:
- the created link is immediately active
- the created link will automatically expire 24 hours after its creation time.
Answering Machine Detection (AMD) on PHONE destinations [#answering-machine-detection-call-link]
When creating a Call Link to a phone destination, you can optionally enable the Answering Machine Detection service to determine if the call is answered by a human or a machine (voicemail).
When AMD is enabled:
- The detection process runs automatically when the call connects.
- A notification appears in the Call Link user interface showing the detection result (human or machine).
- The user must select whether to continue or end the call.
Note: Infobip does not automatically hang up calls answered by a machine or voicemail. The user always controls the call continuation.
Display name override [#display-name-override-call-link]
When the destination of the link is either WEBRTC, CONVERSATIONS or PHONE, you have the ability to define a display name (the name of the correspondent as shown in the Call Link UI of the end user) that must override the defined destination name. This feature can be useful is scenarios where you want to enhance the privacy of the correspondent or give it a less technical name. For instance:
- With PHONE destination, by default the phone number of the called party will be shown as participant name to the Call Link UI end user. For privacy reason, you may prefer to hide this phone number or show an alternate name, such as "John Doe".
- With WEBRTC destination, by default the technical identity (as defined when creating the WebRTC token for that user) will be shown as participant name to the Call Link UI end user. You may prefer to display a more generic name to the end user, such as "Company XYZ Contact Center".
Sharing Call Link URLs over SMS
In some countries such as India, regulations might mandates specific formatting for URLs used in commercial communication messages. India's DLT platform, for instance, requires specific parameters to be included in the URL, often appended after the ? symbol. This ensures that the message adheres to the regulatory requirements and can be processed correctly by the DLT system.
Call Link supports this URL formatting. If your generated URL is https://call-link.com/ABc123, you can insert the ? symbol in the URL so that it becomes https://call-link.com/?ABc123.
Understanding video layouts [#understanding-video-layouts-call-link]
In the Call Link configuration, you can define the different layouts to be applied.
Call Link user interface layouts [#call-link-user-interface-layouts-call-link]
In the Call Link user interface, you can apply different types of layout to the video feeds, participant icons, and screen sharing. The Call Link end user can be offered the ability to switch between layouts (such as GRID and SOLO) using the Device Settings, if this has been defined in the Call Link configuration. It is not possible to switch to SPOTLIGHT layout.
| Layout | Description |
|---|---|
| GRID | The video grid layout tries to fit as many call participants on the screen. Participants with an active camera are placed in the top rows of the grid, as well as participants who have recently talked. Participants tend to keep their position in the grid so as little reordering as possible occurs. Typically a maximum of four camera streams are displayed to the end user in the grid layout, even if more participants would have enabled their camera. When the Call Link end user is on a desktop computer, around 20 participants can fit in to the layout, depending on the screen width. If the number of participants can't form a perfect rectangular N x M grid, the bottom rows will have more elements in it. A call between two participants when the destination is PHONE will always use the grid layout. |
| SPOTLIGHT | The grid layout will switch to a spotlight layout when:
|
| SOLO | In the solo layout, the Call Link end user only sees their video feed, without seeing other participants' videos or icons. This layout is ideal for scenarios where a customer connects to an agent using video only, such as showing an appliance or during KYC and customer onboarding processes where the customer needs to display their ID/passport via video. When screen sharing during the Call Link session:
|
Enabling layouts in the Call Link Configuration [#enabling-layouts-in-the-call-link-configuration-call-link]
To define the available layouts offered or enforced to the end user, use the theme element of a Call Link configuration.
If you define only one layout, this layout applies from the start of the session and cannot be modified by the end user. If you define several layouts, the first specified layout is applied at the start of the session and the end user can change the layout by selecting it from the Device Settings window.
Call Link recordings [#call-link-recordings-call-link]
Call Link session recordings are available for download and review when the destination was PHONE, WEBRTC, or ROOM. These recordings can be accessed through Infobip API or directly from the Infobip web interface.
Destination-specific access [#destination-specific-access-call-link]
- PHONE / WEBRTC / ROOM: See the remainder of this section on how to access your recordings through both API and the Infobip web interface.
- CONVERSATIONS: Refer to the Conversations documentation for details on accessing and managing recordings in this channel.
- APPLICATION: See the Calls API documentation for guidance on retrieving recordings for application-destination calls.
How to access recordings [#how-to-access-recordings-call-link]
Using the API
Use the appropriate API methods to:
- List Call Link recordings.
- Download recordings.
- Delete recordings.
Using the Infobip web interface
- Log in to the Infobip web interface.
- Go to Voice & WebRTC > Recordings.
- Select Call Link from the list of available recording types.